CS150 Lab Guide
This guide explains the most important things you need to know to get started working on CS150 problem sets.Labs
You may work on CS150 problem sets anywhere you choose, including at home. You are highly encouraged, however, to work in the designated CS150 lab so you will benefit from the staffed lab hours there as well as the presence of your fellow classmates. We will send out information on the staffed lab hours and location for each problem set.
Files and Folders
Since most of the work you do on problem sets in this class will be done in the lab, you will need to work out of your home directory (usually the J: drive on ITC machines). To open home directory, click on the house icon on your desktop and enter in your user id and password.
To create a cs150 sub-directory in your home directory, right click in your home directory and select New Folder. Rename the New Folder cs150. Then, open the cs150 folder, and then create another new folder for the current problem set (for example ps1). We recommend you create a new folder for each problem set to avoid confusion with multiple files.
Downloading and Installing Problem Set Files
For most problem sets, we will distribute a zip file containing what you need to get started on the problem set. To download the needed files, go to the current problem set on the course web page and click on the link for the files within the text.When you are prompted to Open or Save the file, select Open which will take you to Winzip. Then specify the directory you want the files to be saved in (the current problem set directory), and click Extract.
Running DrScheme
To open DrScheme from the Start menu, go to the Engineering School folder (S.E.A.S.) and select DrScheme (it has a red and blue logo with a λ symbol, about 2/3 down the menu list).DrScheme is also available for free download from http://www.drscheme.org/ if you wish to install it on your PC at home. You should download version 352 (http://download.plt-scheme.org/drscheme/v352.html), as that is the version in the ITC labs that will be supported by the course staff. There are newer versions available, but they may behave differently from the version we use.
You can also launch DrScheme by double-clicking on a Scheme code file (with a .ss extension).
The first time you run DrScheme, it will pop up a dialog box for you to choose your natural language interaction. We recommend sticking with the default (English), but if you prefer you may use Spanish, French, German, Dutch, Danish or Italian instead.
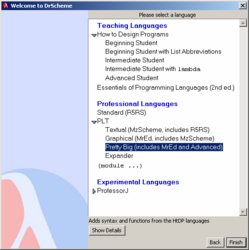
Next, it will ask you to select the programming language. Click on PLT to expand the PLT menu, and then select Pretty Big (includes MrEd and Advanced) for the language and click Finish:

DrScheme Interface
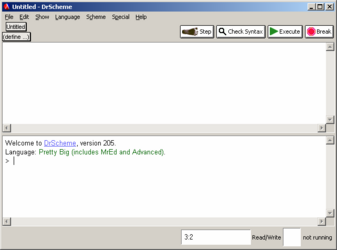
When DrScheme starts, you will see a window like this:

The top half is the Definitions window, the bottom half is the Interactions window. You can make one of the windows disappear (and the other one take over the whole screen) by using Show | Hide Definitions or Show | Hide Interactions.
You should use the Definitions window to edit all the code you will turn in, and use the Interactions window to try evaluating small expressions and to test your code. You can evaluate expressions directly in the Interactions window to just try them out. For instance, try typing (+ 100 50) in the Interactions window, hit return. DrScheme will display:
You can evaluate any Scheme expression you want in the Interactions window, including definitions. However, whenever you click Execute all the definitions you entered in the Interactions window are lost.> (+ 100 50)
150
The Execute button loads the contents of the Definitions window into the Interactions window. Be careful to remember that clicking Execute does not also save your Definitions to the disk. To save your definitions, you must click the Save button which will appear after you make a change in the Definitions window. Remember to save your code often.
Use esc-p in the Interactions window to cycle through previous commands. This can save lots of typing.
Editor
In both the Definitions and Interactions windows, you can type and edit text. The editor is similar to WordPad or NotePad, but is designed especially for editing Scheme code.Scheme interprets everyting to the right of a semicolon (;) as a comment. You should always start your file with comment lines that include your name.
You'll notice when you type a right parenthesis ()), DrScheme will highlight the Scheme expression that it closes (that is, between it and the the matching left parenthesis). This provides a useful clue to notice if you have forgotten or misplaces a parenthesis.
In the Definitions window, when you press return, the editor will go to a new line and automatically indent it according to the structure of your Scheme expression.
You can use Ctrl-f in the editor to search for a string. To quickly find a definition, click on the (define …) button (at the top left) to reveal a list of all names that are defined in the Definitions window. Click on the name you want to jump directly to that definition.
Critters
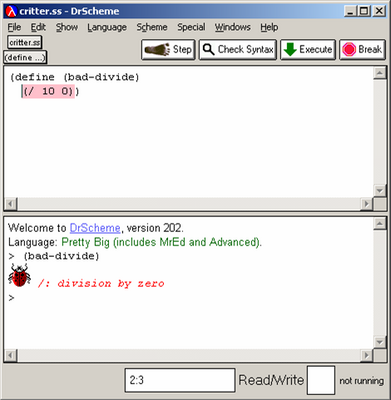
When something goes wrong in evaluating an expression, DrScheme will produce an error message like this:

The expression that was being evaluated will be highlighted in pink. If you click on the friendly-looking critter (sometimes disparagingly called a "bug") at the left of the message, DrScheme will pop up a window that shows you what was being evaluated when the problem occured.
Printing
To print the code in your Definitions window, go to File and select Print Definitions. To print your output in the Interactions window, go to File and select Print Interactions.Please make sure that what you turn in for a problem set clearly marks the questions you are answering. You should not include provided code that you did not change in what you turn in.
Credits: This guide was developed by Katie Winstanley and David Evans for CS200 Spring 2003 and revised for CS150 Fall 2005 by David Evans. It was revised for CS 150 in Spring 2009 by Westley Weimer.