EECS 489 Lab 4: DHT O(N) Case
This assignment is due on Wednesday,
12 Feb 2016, 6 pm.
Introduction
In this lab, we will implement a simplified, Chord-like distributed
hash table (DHT) that takes O(N) time to add a new node
to the DHT. Our DHT relies on on-demand correction of inconsistencies
arising from DHT node additions. You can review the DHT algorithm in
the lecture
on DHT and PA2
walk-through. You can also, optionally, read the paper on
Chord (the algorithm in the paper relies on a periodic, instead
of an on-demand, process to fix inconsistencies).
The dhtn, distributed hash table node, built from the support
code takes the following command line options:
 % dhtn [ -p <node>:<port> -I <ID> -t
<ttl> ]
If the node is run without the
-p option, it forms a new DHT with itself being the only node
overseeing the whole identifier space. The -p option
specifies the target of the node's message when joining an existing
DHT. A node's position in the DHT may not end up being adjacent to
the target node. A node's ID is based on the SHA1 hash of its IPv4
address and port number. As in Lab 3, we assume 8-bit identifiers.
The -I option allows you to override the ID computation and
give the node a static ID. This allows you to test how your code
handles ID collision. It also allows you to test specific node
addition orders and scenarios. The -t option allows you to set
a time-to-live (ttl) value different from the default
DHTM_TTL, defined in dhtn.h, for your join (and
in PA2, search) message(s).
A node is placed between its predecessor and successor in the
identifier ring if its ID is > that of the predecessor and
≤ that of its successor, where the ordering of the IDs
follow modulo arithmetic as in Lab 3. Entering 'p' on the
standard input (console) prints out the node's and
its predecessor's and successor's IDs (don't forget to hit
enter or return after the 'p').
[Unfortunately, console I/O is not implemented for Windows.]
Assumptions
To make the lab more manageable, we make the following simplifying
assumptions:
- No node departure: once a node joins the DHT, it doesn't depart
until you take down the whole DHT. This means that, as in PA1, you
don't need to clean up after a node departure, only be sure
that you can take down the DHT without node crashing.
- Node join process does not fail. To assume otherwise would
require a bit more complicated 2-phase commit join protocol.
- No concurrent joins. Nodes are added one a time. The provided
support code most likely will work with concurrent joins, but it
has not been tested for it. Consequently, until a node has completed its
join process, it will interpret receiving a join packet from another
node as an error.
- Every time a node needs to send a message, it opens a new
connection to the target node. The sender immediately closes the
connection once the message is sent. So there is no permanently
opened connections, unlike in PA1. The only exception to this
single message per connection rule is when performing on-demand
correction of DHT inconsistency due to node addition, as explained
below.
- When the ID range of a node changes, usually when its
predecessor node changes, its whole image database is reloaded
and its Bloom Filter recomputed.
Join Protocol
When the first node runs, it starts a listening socket, prints out its
<hostname>:<port> on the screen and waits for
join requests. Subsequent nodes should be started with an existing
node's <hostname>:<port> provided on the command
line. Each subsequent node first creates its own listening socket and
then connects to the provided node, sending over a join request with
its own ID, IPv4 address, and listening port number. The packet
format defined as dhtmsg_t in dhtn.h is as follows:
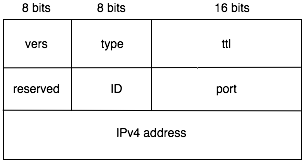 The version number MUST be DHTM_VERS, as
defined in dhtn.h. The dhtm_type field encodes the
type of packet. Packets of type DHTM_JOIN and
DHTM_REID use the same format. In the case of
DHTM_JOIN, the port and IPv4 address carried by the packet,
as part of dhtnode_t, are those of the joining node. In the
case of DHTM_REID, the dhtnode_t field is not
used.
After a node has sent out its join packet, it goes into a
select() loop waiting for a connection to arrive at its
listen socket or, if not running on Windows, for input on standard
input (console). Since we open a separate connection for each
message, when a connection is established, we immediately go into
receiving mode. Each new connection is assigned an ephemeral source
port different from the port it's listening for connection.
To identify a node, use its ID instead of its source port.
There are two possible outcomes to a join attempt: either there is an
ID collision and the node is asked to generate a new ID and try again
(i.e., it receives a DHTM_REID packet), or it receives a welcome
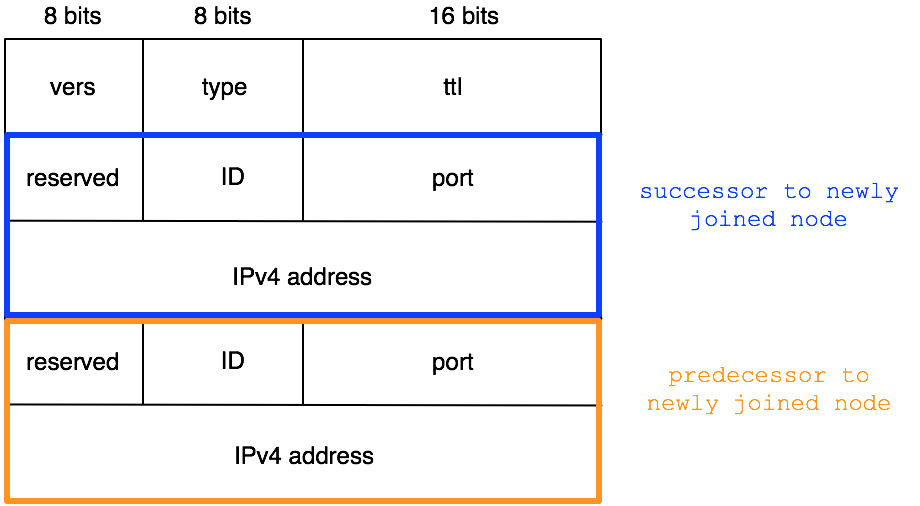
message, informing it of its successor and predecessor nodes. The packet
format used for DHTM_WLCM packet is dhtwlcm_t defined
in dhtn.h and it is very similar to dhtmsg_t but for an
additional dhtnode_t in the packet. The first
dhtnode_t in the welcome packet is the
successor to the joining node and the second
dhtnode_t its predecessor. The figure below shows the packet
format of dhtwlcm_t:
The version number MUST be DHTM_VERS, as
defined in dhtn.h. The dhtm_type field encodes the
type of packet. Packets of type DHTM_JOIN and
DHTM_REID use the same format. In the case of
DHTM_JOIN, the port and IPv4 address carried by the packet,
as part of dhtnode_t, are those of the joining node. In the
case of DHTM_REID, the dhtnode_t field is not
used.
After a node has sent out its join packet, it goes into a
select() loop waiting for a connection to arrive at its
listen socket or, if not running on Windows, for input on standard
input (console). Since we open a separate connection for each
message, when a connection is established, we immediately go into
receiving mode. Each new connection is assigned an ephemeral source
port different from the port it's listening for connection.
To identify a node, use its ID instead of its source port.
There are two possible outcomes to a join attempt: either there is an
ID collision and the node is asked to generate a new ID and try again
(i.e., it receives a DHTM_REID packet), or it receives a welcome
message, informing it of its successor and predecessor nodes. The packet
format used for DHTM_WLCM packet is dhtwlcm_t defined
in dhtn.h and it is very similar to dhtmsg_t but for an
additional dhtnode_t in the packet. The first
dhtnode_t in the welcome packet is the
successor to the joining node and the second
dhtnode_t its predecessor. The figure below shows the packet
format of dhtwlcm_t:
 In dhtn::handlepkt() we check whether the returning packet is
of type DHTM_REID or DHTM_WLCM. In the former case,
we call dhtn::reID() to regenerate a new ID and then call
dhtn::join() again with the new ID to retry the join attempt.
In the latter case, we store the first dhtnode_t in the
return packet in the dhtn class member variable
fingers[DHTN_SUCC], which is where we keep the successor node's
information. Then we store the second dhtnode_t in the class
member variable fingers[DHTN_PRED]. We use a
fingers[] array instead of separate sucessor and predecessor
variables in anticipation of PA2.
The function dhtn::handlepkt() has been provided to you in
full. Please take your time to read it carefully and make sure you
understand what it is doing. Pay attention to how the socket whence a
packet arrived is closed as soon as we finish receiving the packet.
The only exception is when the arriving packet is a DHTM_JOIN
packet, in which case we call dhtn::handlejoin() to handle
the packet. In dhtn::handlejoin() be sure to close the
sender socket as soon as you're done with it. Otherwise, you could
run into a deadlock situation where multiple nodes are waiting for
each other to complete transmission and close connection.
In dhtn::handlepkt() we check whether the returning packet is
of type DHTM_REID or DHTM_WLCM. In the former case,
we call dhtn::reID() to regenerate a new ID and then call
dhtn::join() again with the new ID to retry the join attempt.
In the latter case, we store the first dhtnode_t in the
return packet in the dhtn class member variable
fingers[DHTN_SUCC], which is where we keep the successor node's
information. Then we store the second dhtnode_t in the class
member variable fingers[DHTN_PRED]. We use a
fingers[] array instead of separate sucessor and predecessor
variables in anticipation of PA2.
The function dhtn::handlepkt() has been provided to you in
full. Please take your time to read it carefully and make sure you
understand what it is doing. Pay attention to how the socket whence a
packet arrived is closed as soon as we finish receiving the packet.
The only exception is when the arriving packet is a DHTM_JOIN
packet, in which case we call dhtn::handlejoin() to handle
the packet. In dhtn::handlejoin() be sure to close the
sender socket as soon as you're done with it. Otherwise, you could
run into a deadlock situation where multiple nodes are waiting for
each other to complete transmission and close connection.
Task 1
Your first task is to write the function dhtn::handlejoin(). There are four cases you need to consider in writing this function:
- When the joining node's ID collides with that of the current
node or its predecessor, send back to the joining node a
DHTM_REID message, as described above.
- When the joining node's ID falls within the identifier range of
the current node, the correct spot on the identifier ring has been
found for the joining node, insert it into place and inform the
joining node of its place in the identifier ring by sending it a
DHTM_WLCM message as described above. When the joining
node is inserted into place, it splits the current node's ID range.
- When the joining node's ID is not within the current node's
identifier range, but the node forwarding the join request believes
it to be within the current node's range---this indicates that the
forwarding node's successor information has become inconsistent due
to earlier node addition(s), send a DHTM_RDRT message to
the node forwarding the join request (not to the joining
node).
- When a DHTM_JOIN message must be forwarded along the
DHT by calling dhtn::forward() (see Task 2 below).
See comments in dhtn.cpp:dhtn::handlejoin() for
what you need to do for each of the above cases. Don't forget to close
the socket passed to dhtn::handlejoin() as soon as you don't
need it, to prevent deadlock situation. This task takes no more
than 35-45 lines of code. You will need your
hash.cpp:ID_inrange() code from Lab 3.
Task 2
The function dhtn::forward() handles the forwarding of
DHTM_JOIN messages. It is also where we implement the
"on-demand" repair of the DHT identifier ring inconsistencies arising
from node additions. Before forwarding a join message, check whether
the ID of the joining node falls within the expected range of the node
to which the message is to be forwarded. If so, set the
DHTM_ATLOC bit of the message's dhtm_type. As
detailed in the description for Task 1 above, if this expectation is
misplaced, the node to which the join message is forwarded will return
a DHTM_RDRT message. A DHTM_RDRT message has the
same format as a DHTM_JOIN message, except that the
dhtnode_t field contains the address and port number of a
suggested replacement successor node. We always accept the
suggestion, make it our new successor node, and re-send the join
message to it, with DHTM_ATLOC set. If there had been
multiple additions to the DHT, the suggested successor may yet again
turn out to be inconsistent information. In which case, we may have
to change successor node and retransmit the join request multiple
times.
Every time a DHTM_JOIN packet is forwarded, including
re-forwarding in response to the receipt of a DHTM_RDRT, its
dhtm_ttl field is decremented by one. When the ttl
reaches 0, the packet is dropped. Since the join process is assumed
not to fail, and since we don't have the equivalent of ICMP
implemented for this assignment, if a join packet is dropped due to
ttl expiration, you'll simply be prompted to re-run your test
case with a larger ttl (specified using the -t
command line option).
The comments in dhtn.cpp:dhtn::forward() contain further
details that should help in implementing this function. This second
task should take about 20 lines of code. In completing both tasks 1
and 2, you may use the functions in socks.cpp provided as part
of the support code (or use your own implementation from PA1).
Testing Your Code
The provided dhtn is linked with the imgdb class so
you can use netimg from Lab 3 to query it for an image. To
simplify experimentation, you can let all instances of your
dhtn share the same images folder, but each
dhtn instance should load to its image database only those
images whose IDs fall within its purview. We are not implementing
search on the distributed hash table in this lab, so only query for
images within a dhtn's ID range may return an image. In your
test, you can run netimg multiple times, each time connecting
to a different dhtn, requesting images within and outside the
node's ID range. As in PA1, each dhtn has two sockets: one
to communicate with other DHT nodes, the other for netimg
clients to query the node's imgdb.
After each node addition, the successor information of previously
added nodes may have become inconsistent such that when you hit
'p' you will see inconsistent successor information. This is
alright. However, for each new node you add, entering 'p' at
that newly joined node should show you the correct successor node.
Only after additional nodes have joined the network is the successor
information of existing nodes allowed to be inconsistent. While the
successor information is allowed to become inconsistent, the
predecessor information must stay consistent at all times. So if you
hit 'p' on each node, you should be able to reconstruct the
correct identifier ring by following the predecessor node information
at each node.
Support Code
The support code is available as lab4.tgz.
It contains only three files: a Makefile, dhtn.h,
and dhtn.cpp. To build the dhtn program, you need
your files from Lab 3. You could simply copy over these new files
from Lab 4 to your Lab 3 folder. If you want to save the
Makefile from Lab 3, please do so before you copy over and
overwrite it with the new Makefile. We assume you have a
working imgdb and ID_inrange() function from Lab 3.
If you didn't manage to get these functions to work in Lab 3, you can
get the solutions for 10 of your PA2 points. As with Lab 3, only
those who have completed PA1, or inform us that they are not going to
complete PA1, will have access to the support code because the support
code reveals the solution to parts of PA1.
You can also find the reference implementation refdhtn
in /afs/umich.edu/class/eecs489/w16/lab4.
The reference implementation is,
as usual, compiled on CAEN eecs489 hosts running Red Hat 7, so
don't try to run it on Mac OS X or Windows machines.
The support code has been compiled and tested on Linux, Mac OS X,
and Windows. As with Lab 3, on Ubuntu and Windows, you'd need to
install the OpenSSL library (see Lab 3 specs for instructions).
Submission Instructions
As with Lab 1, to incorporate publicly available code in your
solution, or to pass off the implementation of an algorithm as that of
another are both considered cheating in this course. If you can not
implement a required algorithm, you must inform the teaching staff
when turning in your assignment.
Your submission must compile and run without errors on CAEN
eecs489 hosts using the provided Makefile, unmodified, without any additional libraries or
compiler options.
Your "Lab4 files" comprises your dhtn.cpp
file.
To turn in your Lab4, upload a zipped
or gzipped
tarball of your Lab4 files to the CTools Drop Box. Keep your own backup copy! The timestamp on your
uploaded file is your time of submission. If this is past the
deadline, your submission will be considered late. You are allowed
multiple "submissions" without late-policy implications as
long as you respect the deadline. We highly recommend that you use a
private third party repository such as github
or M+Box or Dropbox or Google Drive to keep the back up copy of your
submission. Local timestamps can be easily altered and cannot be used
to establish your files' last modification times (-10 points). Be
careful to use only third-party repository that allows for
private access. To put your code in publicly accessible
third-party repository is an Honor Code
violation.
Turn in ONLY the files you have modified. Do
not turn in support code we provided that you haven't modified (-4 points).
Do not turn in any binary files (object, executable, dll,
library, or image files) with your assignment (-4 points). Your code
must not require other additional libraries or header files other
than the ones listed in the Makefile (-10 points).
Do remove all printf()'s or
cout's and cerr's and any other logging statements
you've added for debugging purposes. You should debug using a
debugger, not with printf()'s. If we can't understand the
output of your code, you will get zero point.