
Review the grading policy page on the course website. Remember that to incorporate publicly available code in your solution is considered cheating in this course. To pass off the implementation of an algorithm as that of another is also considered cheating. For example, if the assignment asks you to implement sort using heap sort and you turn in a working program that uses insertion sort in place of the heap sort, it will be considered cheating. If you can not implement a required algorithm, you must inform the teaching staff when turning in your assignment by documenting it in your writeup.
In this assignment you will implement the midpoint line drawing algorithm to rasterize line segments, scan conversion of triangles, line clipping and line anti-aliasing. You will use barycentric coordinates to interpolate colors and provide anti-aliasing for lines and triangles.
Download and extract the support code gzipped tarball. The support code should compile under Linux, Mac OS X, and Windows. We provide a Makefile to build the application on the command line. We do not provide any IDE (Eclipse, Visual Studio, or XCode) project files. If you're going to use an IDE, please take a look at the Makefile to find out which source files, header files, and libraries must be included in your project. For this assignment, the Makefile builds two applications. The first one, called vcanvas, depends only on the files vcanvas.cpp, rasterizer.cpp, rasterizer.h, and xvec.h. The second one, called draw, requires all the .cpp and .h files provided, except vcanvas.cpp. To use an IDE you must create two separate projects, one to build vcanvas, the other to build draw. If you include both draw.cpp and vcanvas.cpp in either project, your IDE will complain and you won't be able to build either program. It may also be helpful to read the details on setting up IDE projects in the Building OpenGL/GLUT Programs course note.
Once you've built vcanvas and run it, you should see a window similar to the one from Labs 1 and 2. The program displays a coarse grid of virtual pixels and allows you to draw one line or one triangle at a time. Two clicks on different virtual pixels give you a line. A third click on a pixel different from the first two gives you a triangle. The program is very simple and doesn't check for degenerate, e.g., colinear, triangles. Either of the following actions clears the grid, ready for another line or triangle to be drawn:| a | Toggles anti-aliasing on and off. |
| c | Toggles clipping on and off. When clipping is on, a clipping window is drawn on the grid. Only line clipping is currently supported; triangle clipping is not supported. |
| t | Turns the first (red) vertex of the line or triangle transparent, cycling through alpha values of 0.75, 0.5, 0.25, 0.0, and back to 1.0 on each press of the keyboard shortcut. (The size of alpha decrement is controlled by the ALPHA_DEC macro in vcanvas.cpp.) |
| q | Quits the program. |
Search rasterizer.cpp for /*YOUR CODE HERE*/ to find where
you can put your implementation. All your modifications must be
within rasterizer.cpp (and rasterizer.h if necessary).
Do NOT use any OpenGL state or call any OpenGL function. You are writing a
software rasterizer; to use OpenGL's rasterizer would be considered cheating.
Besides, the support code will malfunction if you use OpenGL in your code.
The vector class
XVec
is used heavily throughout this course. Be comfortably familiar with it.
The assignment uses two graphical primitives. The first is the line.
In rasterizer.cpp implement the following function using the
midpoint line rasterization algorithm:
void Line::drawInRect(XVec4i& clipWin);
The argument clipWin is described in the
Line Clipping section below.
The lines drawn should be 1-pixel thick, that means every row
(or every column, or both) contains at most one pixel.
You can draw a solid red line first to test your line drawing code.
You may, and are expected to, simply adapt your Lab1 code for this
task (which is why it is not worth that many points).
Once your line drawing code is correctly implemented, incorporate color
interpolation across the line using the parametric equation of a line segment;
do not forget to interpolate the alpha values also.
To set pixels use the function:
void drawPoint(XVec2f& p, XVec4f& color);
To test your line drawing code, build and run the vcanvas application.
Click in the virtual canvas to set the first end point of the line.
Then move the mouse and click on another virtual pixel to set the second
end point, release the mouse button and click again (double click) on the
same virtual pixel to draw a line. Moving the mouse before that third
click produces a triangle.
The second graphical primitive is the triangle.
In rasterizer.cpp implement the function:
bool Triangle::containsPoint(XVec2f& p, XVec4f& pointColor);
It returns a boolean denoting whether the point p is
within the triangle; if it is, the function returns true
and sets pointColor to be the interpolated color of the
vertices' colors, using barycentric coordinates. You may, and are
expected to, adapt your Lab2 code for this task. To test your
triangle drawing code, you may want to return only the color blue
initially. Once your triangle drawing code is correctly implemented,
incorporate color interpolation using barycentric coordinates; again,
do not forget to interpolate the alpha values.
Next implement the function:
void Triangle::drawInRect(XVec4f& clipWin);
It should draw a triangle using scan conversion; be sure to have it
use the function containsPoint() above! Build and run
the vcanvas application to test your triangle rasterization code.
The argument clipWin of function
Line::drawInRect(XVec4f& clipWin) is a 4-vector
containing, in order, the x-coordinate of the lower left corner,
the y-coordinate of the lower left corner, the width, and the
height of the clipping window.
drawInRect()
function before drawing. When clipping, do not modify the vertices
of the given line segment, instead use local variables to store the
clipped endpoints. If you have written your line rasterization code
above to use the vertices of the given line segment, you would need
to modify it to use the clipped endpoints instead. When a line is clipped,
its color interpolation must be clipped accordingly. For example, if
one vertex is red and the other is green and the line is clipped
three quarters of the way towards green, the clipped line should
show only gradations of green.
Note: the triangle clipping provided in draw.cpp is a brute
force rejection test of every pixel. Do not use the brute
force method for your line clipping. You are required to
implement both the Cohen-Sutherland and the Cyrus-Beck algorithm. Use
Cohen-Sutherland to trivially accept/reject a line. Then clip those
lines that Cohen-Sutherland cannot trivially accept/reject using the
Cyrus-Beck algorithm. If you cannot implement either algorithm, you
must say so in your writeup. To pass off another algorithm as the one
required is considered cheating.
To test your line clipping code, first draw a clipping window by
pressing 'c', then draw a line with one or both end points outside the
clipping window. Pressing 'c' repeatedly toggles the clipping window
on and off. The clipping window is of fixed size and location. The
lower left corner of the clipping window is currently set at (4,4) in
virtual pixel coordinates (controlled by macros CMINX and
CMINY in vcanvas.cpp). The size of the clipping
window is (screen_width/2, screen_height/2). Note that a
virtual pixel at coordinate (x, y) is centered at (x+0.5,
y+0.5). So when drawing pixels be aware when you need to use
rintf(), floorf(), or ceilf() to convert
from float to int. When clipping is on,
portion(s) of the displayed line outside the clipping window is shown
in shades of grey and the portion inside the clipping window is shown
in color. Your clipping code should not change the rasterization of a
line (which pixels are turned on to draw the line). However, due to
precision error, you may find some pixels inside the clipping window
near its boundaries to be grayed out. This is ok.
What to Test
Here are some of the cases we will test for:
The Line object has a member variable denoting whether it should be drawn anti-aliased. If this variable is set to true, draw your line anti-aliased using an area-sampling based algorithm briefly described as follows.
Considering only lines with slope 0 ≤ m ≤ 1,
the midpoint algorithm begins by drawing a point, then it moves right,
and perhaps up, and repeats. Every time the algorithm draws the point
(x,y), it also draws the point above or below the point.
Doing this will create a
two-pixel thick line. Now just set the alpha values of those two pixels
"appropriately" and the line will appear smoother. It is part of the
assignment for you to determine how to set the alphas appropriately.
(Hint: between what values is fmid/dx in the midpoint algorithm?)
Further, if the alphas of the line's two endpoints are not the same,
for each point on the line, the alphas of the two pixels should add
up to the interpolated alpha at that point. This is a form of anti-aliasing
by area sampling, also known as pre-sample filtering. See Lecture 8
for further discussion on the algorithm.
Press the 'a' key to toggle anti-aliasing on and off.
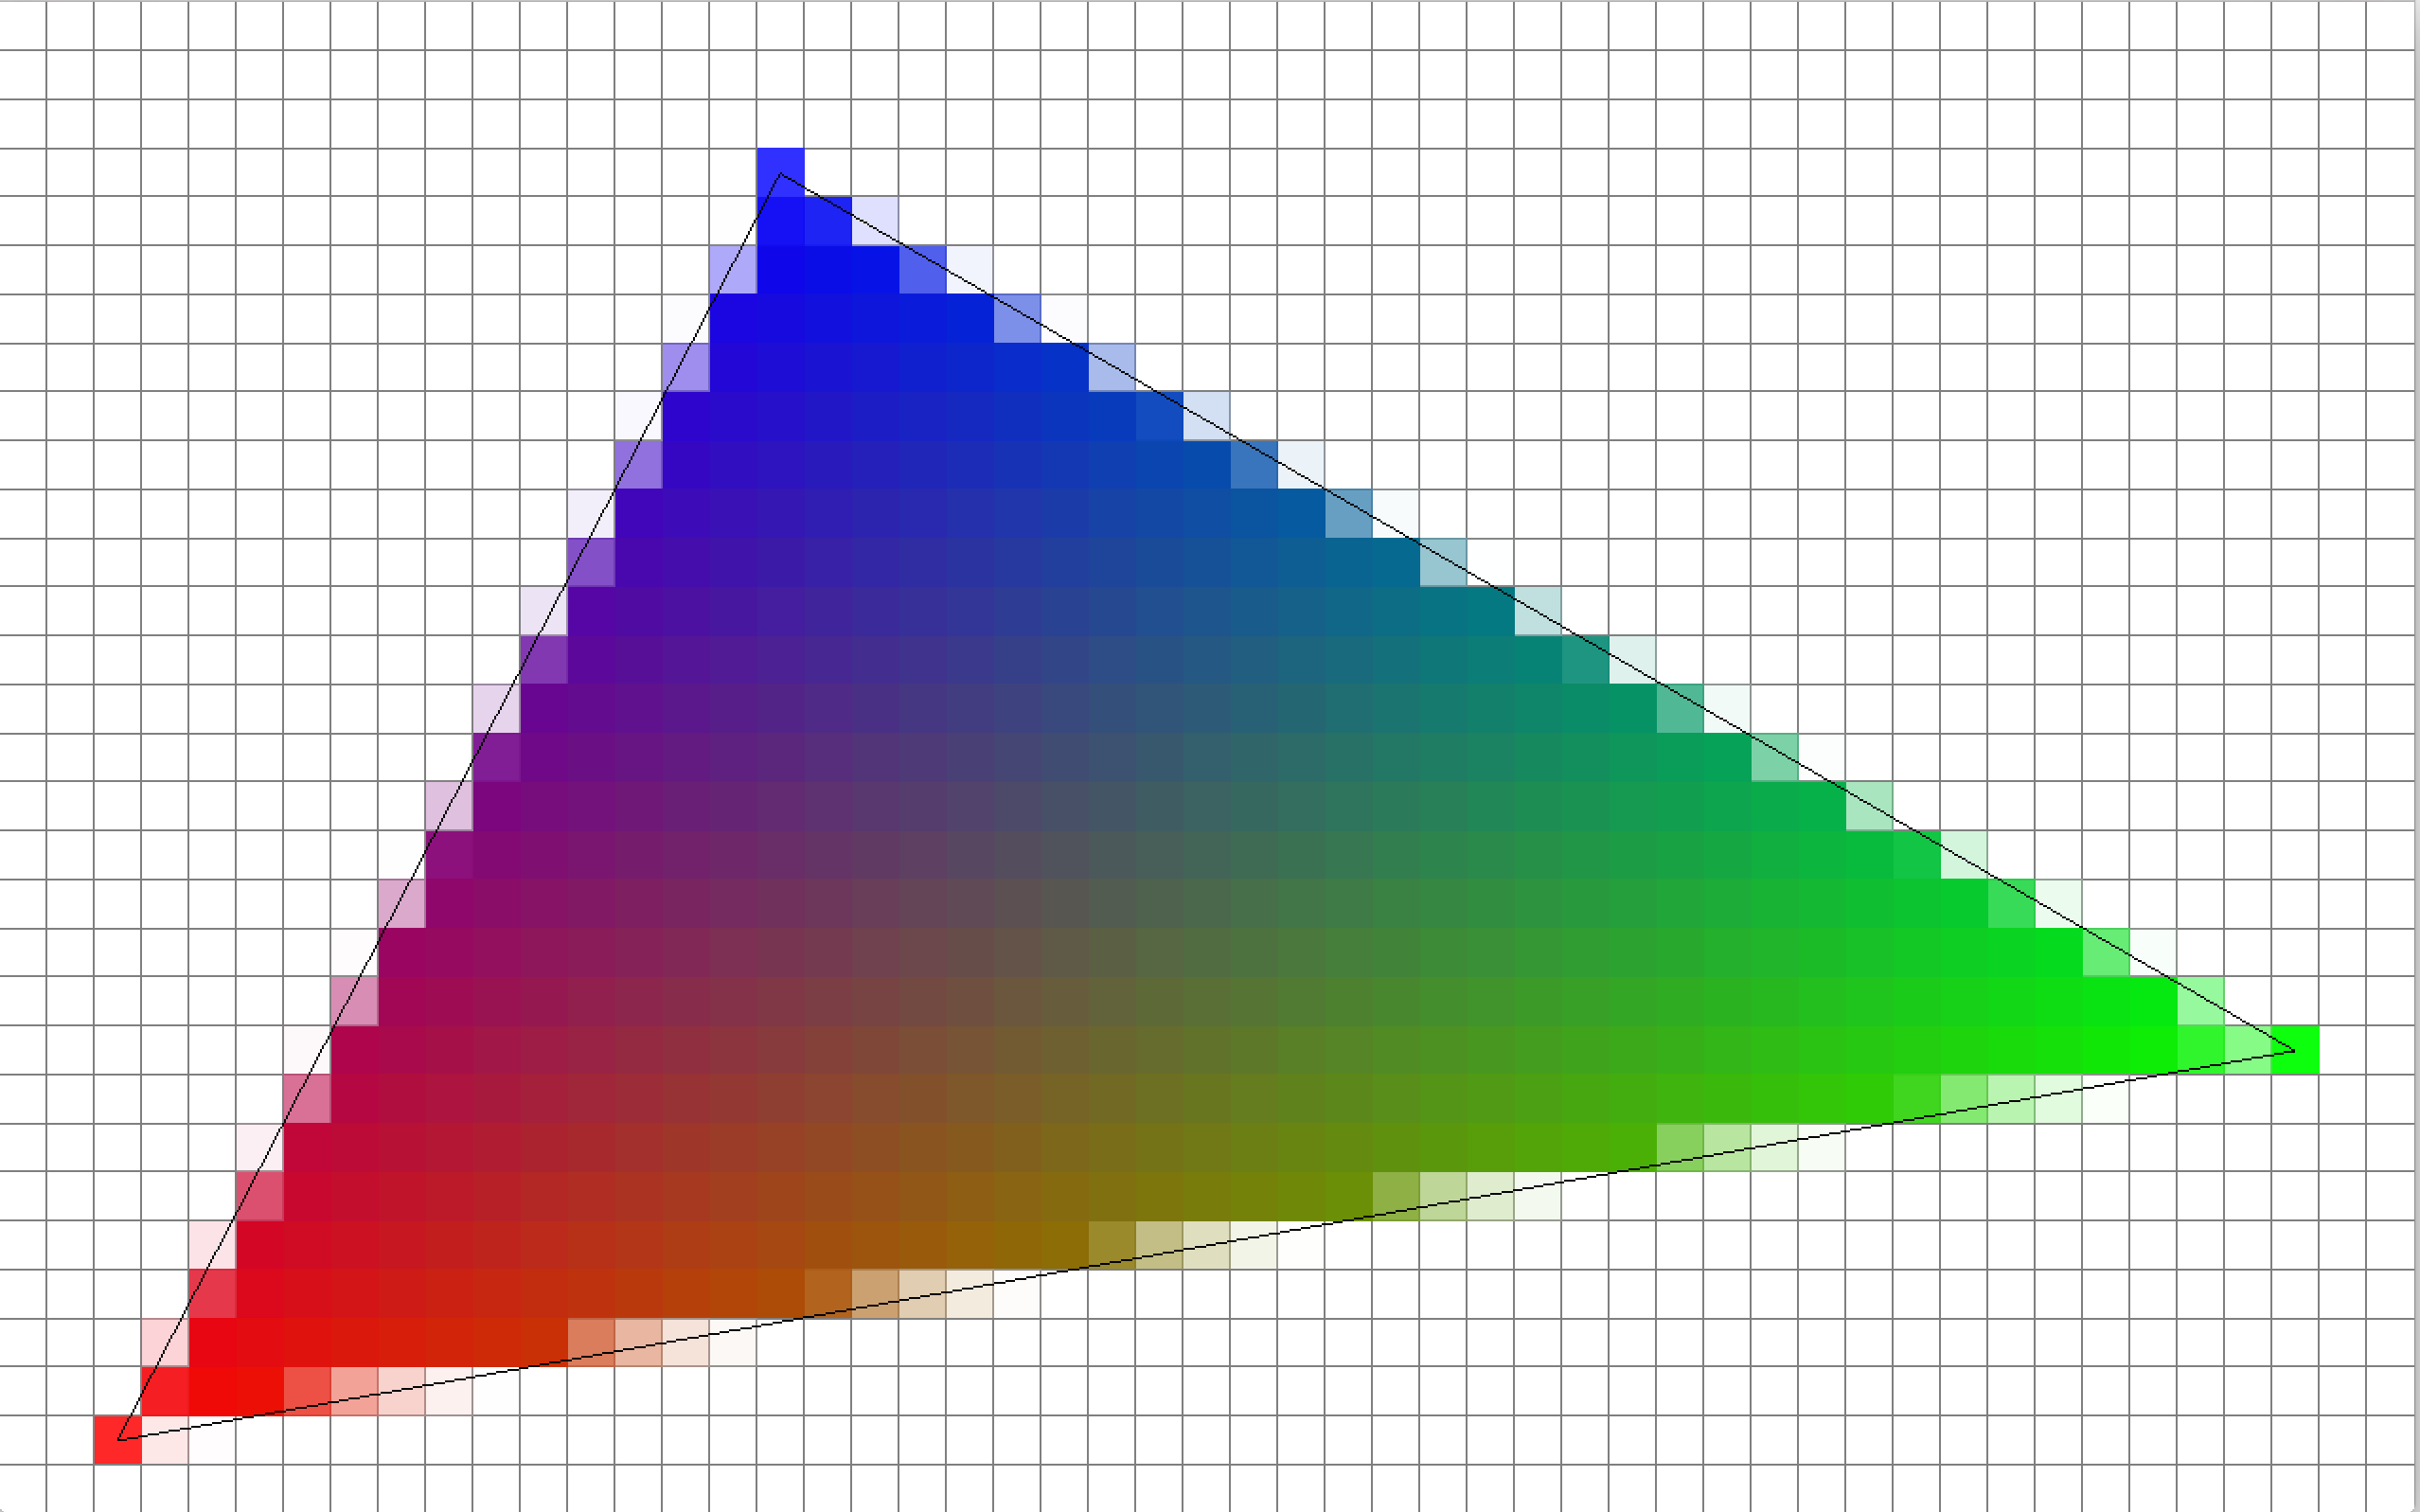
The figure below shows an anti-aliased line clipped to the clipping
window. (The color of the anti-aliased line becomes darker
when clipping is turned on. This is due to our drawing a greyed-out
unclipped line under the clipped line. The color of each pixel is
blended with the greyed-out pixel, darkening the color. This is okay
as long as your pixels do not turn completely grey.)
The Triangle object has a member variable denoting whether it should be drawn anti-aliased. If this variable is set, draw the triangle anti-aliased using multi-sampling with at least four samples. That is, for every pixel, compute and average the colors of at least four subpixels. Recall that we differentiate multi-sampling from super-sampling. Whereas super-sampling draws into a large buffer and then average down and re-draw to a smaller buffer, multi-sampling averages the color of multiple sub-pixels of a pixel in a single buffer. It does not use multiple buffers of different sizes. You can treat a given pair of pixel coordinates as specifying the lower left corner of the unit area covered by a pixel.
Press the 'a' key to toggle anti-aliasing on and off.
Remember that if you cannot implement an algorithm, you must disclose
it in your writeup. This applies to the anti-aliasing algorithms also.
Clicking on an existing triangle selects it. Selection of triangles
uses the function containsPoint(). Make sure to test
this function with "hardware rendering" turned on. When a line or
triangle is selected, its vertices have boxes drawn on them and a thin
edge surrounds it. One vertex will have a yellow box; this is the
selected vertex. The picker on the right can be used to modify the
color of the selected vertex (which is always displayed at the top of
the picker). Try playing with the sliders (the diamond-shape outlines
on the "Opacity", "Hue", and "Saturation+Value" boxes) to change the
hue, saturation, value (color spaces such as this, HSV, will be
discussed later in the course), and alpha (opacity) of the vertex.
User can select any already drawn line or triangle or its vertices and
change the color accordingly. The picker will not function if no
vertex is selected.
| g | Toggles a grid on and off to help alignment of vertices. |
| x | Toggles snapping on and off. With it enabled, vertices will automatically snap to the grid (even if it is not visible). |
| backspace | Deletes the currently selected object. |
| a | Toggles anti-aliasing of the currently selected object. Polygon anti-aliasing in the hardware renderer is not implemented, so do not expect to compare your results against those produced by the hardware renderer. |
| h | Toggles between hardware and software rendering. Toggle on
hardware rendering to see how the application is supposed to
behave in terms of color interpolation and clipping using
OpenGL instead of your code. Note that without your
Triangle::containsPoint(), triangle selection
doesn't work. |
| c | Enables the user to draw a clipping window on the screen: press
'c', then press the mouse button to mark one corner
of the clipping window, without releasing the mouse button, drag
the mouse to the opposing corner of the clipping window and
release the mouse button. |
| CTRL+c | Toggles clipping on and off toggle clipping off and on (when drawing a clipping window, clipping is automatically toggled on). When clipping is toggled on, lines and triangles will be clipped to the clipping window; visually, the portions inside the clipping window will be shown in color, while those outside will be shown in grayscale. Toggle on "hardware rendering" to see how clipping is supposed to work. You only need to implement the line clipping function, the draw program provides the triangle clipping function. |
| f | Brings the currently selected object forward. There may be no visual change if the object "above" it does not overlap. The user may have to tap 'f' a few times to move an object forward enough. |
| CTRL+f | Brings the currently selected object to the front. |
| b | Sends the currently selected object backward. There may be no visual change if the object "below" it does not overlap. The user may have to tap 'b' a few times to move an object backward enough. |
| CTRL+b | Sends the currently selected object to the back. |
| CTRL+n | Clears the canvas and creates a new scene. It does not save the current canvas or re-confirm canvas clearing, so be careful! |
| CTRL+o | Type in the name of a file to open in the input area above the canvas. |
| CTRL+s | Saves the scene. It also saves a tga image of the scene. If this is the first time you try to save and the file is untitled, CTRL+s behaves the same as CTRL+SHIFT+s below. In Mac OS X, choosing "Save" under the "File" menu or hitting CMD+S will store a screen shot of the application as a tiff file instead (which is not what you should turn in). |
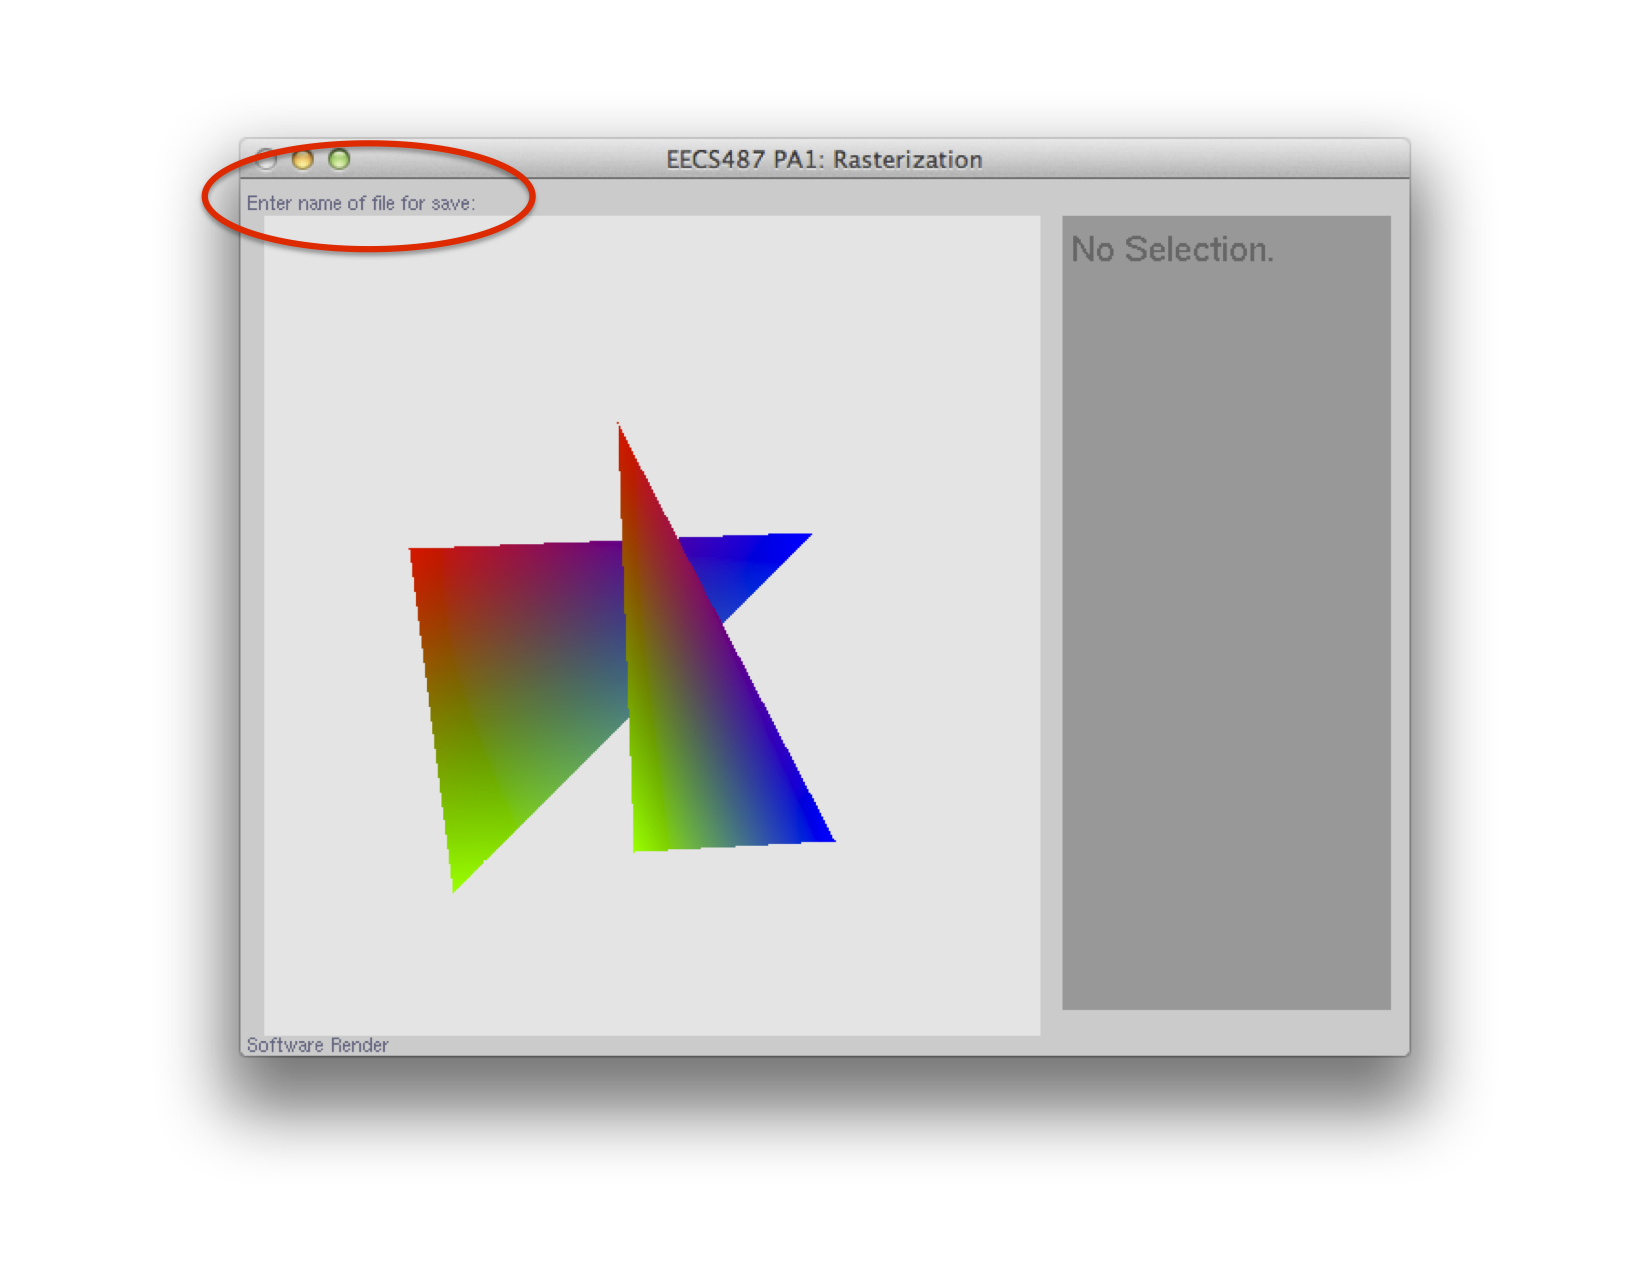
| CTRL+SHIFT+s | Type in the input area above the canvas the name of a file for saving.
It also saves a tga image of the scene under the same name, appended
with a ".tga " extension, as shown in the screen shot below. Note that
in Mac OS X, choosing "Save As" under the "File" menu or hitting CMD+SHIFT+s
will create a screen shot of the application as a tiff file instead.
|
| ESC | Cancel the current operation. It applies to line drawing, triangle drawing, clip area drawing, and file name input. |
The application does not feature undo/redo nor cut/copy/paste. When the grid is on, it is visible; when snapping is on a magnet is shown in the upper left corner; whether rendering is currently done in hardware or software is displayed in the lower right corner. Play, fidget, and have fun!
WARNING: The program reads and writes a simple file format. Modify the files created at your own peril.
Test your compilation! Your submission must compile without errors and warnings (on Visual Studio, warnings of "PBO file not found" is ok). Code that does not compile will be heavily penalized.
Create a writeup in text format that discusses:
% cd <to where your image.tga file is located>% /afs/umich.edu/class/eecs487/scripts/postimg <image.tga> [<image2.tga ...>]writeup-uniqname.txt,
rasterizer.cpp, and, if modified, rasterizer.h.
Your code must not require other external libraries
or include files other than the ones listed in the Makefile.
To turn in your PA1, upload a zipped or gzipped tarball of your
PA1 files to the CTools Drop Box.
Keep your own backup copy!
The timestamp on your uploaded file will be your time of submission.
If this is past the deadline, your submission will be considered late.
You are allowed multiple "submissions" without late-policy implications
as long as you respect the deadline.
Turn in ONLY the files you have modified.
Do not turn in support code we provided that you haven't modified.
Your code must not require other external libraries or include files
other than the ones listed in the Makefile.
For this assignment, you should turn in only your
writeup-uniqname.txt, rasterizer.cpp, and,
if modified, rasterizer.h.
Do not turn in any binary files (object, executable, or image)
with your assignment. Post your image(s) to the course's Image
Gallery using the postimg script as explained above.
Do remove all printf()'s or cout's and cerr's you've added for debugging purposes.
const, enum, or #define
to give your literals meaningful names. We do deduct points for each
occurrence of literals, even if it is the same one. The only
exceptions will be for loop counter, command-line options, NULL(0) and
TRUE/FALSE(1/0) testing/setting, help and error messages printed
out to user, and mathematically well-defined uses
such as (1-probability) or (1-interpolating_factor) or to test for
negativite values (< 0), etc. The intent here is to ensure that
should the literal value need to be changed in the future, it only
needs to be changed at one place. Thus defining '0' as "ZERO" does not
serve this purpose because should the value '0' needs to be changed in
the future, the macro "ZERO" becomes totally misleading. We will thus deduct
points for such semantically meaningless names also.
int temp; // declare temp. variable
printf's or fprintf's or cout.
Nor whether your ADTs
have the cleanest interfaces. In general, if the tradeoff is between
illegible and fast code vs. pleasant to read code that is unnoticeably
less efficient, we will prefer the latter. (Of course pleasant to read
code that is also efficient would be best.) However, take heed what you
put in your code. You should be able to account for every class, method,
function, statement, down to every character you put in your code.
Why is it there? Is it necessary to be there? Can you do without?
Perfection is reached not when there is nothing more to add, but when
there is nothing more that can be taken away, someone once said.
Okay, that may be a bit extreme, but do try to mind how you express
yourself in code.
stdout with unnecessary
output. Use gdb to debug.
stderr unless there is an error.
To encourage early start on the assignment we will stop helping you to debug 48 hours before the due date. For a Wednesday 10:00 pm deadline, we stop helping you at 10:00 pm on the Monday prior.