Problem Set 1: Making Mosaics
- Bring in to class a stapled turn-in containing your written and printed answers to Questions 1-6 (including the code you submitted electronically). In addition to your name, please include your UVA ID (e.g., mst3k) in big block letters at the top of your turn-in.
- Use our automatic adjudication service to submit a single Python file (a modification of ps1.py) containing your answers to Questions 3 - 5. You must define an author list. If you are working with a partner, you must each separately submit a copy of your joint file.
Collaboration Policy - Read Carefully
For the written part of this assignment (Questions 1 and 2) you must work alone. For the programming part of this assignment (Questions 3 - 5) you may work alone or with one partner of your choice. If you work with a partner, you and your partner should each separately submit your programming results. If you and your partner are at the same computer, you can log out of Netbadge and log back in as your partner to submit it the second time (or email your partner a copy of the file, etc.).Before you start working with your partner, you should read through the assignment yourself and think about the questions.
Remember to follow the pledge you read and signed at the beginning of the semester. For this assignment, you may consult any outside resources, including books, papers, web sites and people, you wish except for materials from previous cs1120, cs150, and cs200 courses. You may consult an outside person (e.g., another friend who is a CS major but is not in this class) who is not a member of the course staff, but that person cannot type anything in for you and all work must remain your own. That is, you can ask general questions such as "can you explain recursion to me?" or "how do lists work in Python?", but outside sources should never give you specific answers to problem set questions. If you use resources other than the class materials, lectures and course staff, explain what you used in your turn-in.
You are strongly encouraged to take advantage of the scheduled help hours and office hours for this course.
Purpose
- Introduce divide and conquer problem solving.
- Provide exposure to recursive definitions and functions as parameters.
- Provide experience reading a Python program.
- Learn to use and create functions.
- Gain familiarity with the PyCharm environment and Python programming language.
- Make a pretty picture.
Background
 A mosaic is a picture made up of lots of smaller pieces. The ancient
Babylonians constructed elaborate mosaics using colored tiles. A
photomosaic is a mosaic, except instead of using single color
tiles for the tiles, it uses photographs. For some example
photomosaics, see
http://www.photomosaic.com/portfolio.html.
A mosaic is a picture made up of lots of smaller pieces. The ancient
Babylonians constructed elaborate mosaics using colored tiles. A
photomosaic is a mosaic, except instead of using single color
tiles for the tiles, it uses photographs. For some example
photomosaics, see
http://www.photomosaic.com/portfolio.html.
Making a photomosaic is a big task. The way computer scientists (and most other people) solve big problems is to break them into a few smaller sub-problems whose solutions can be combined to solve the original problem. This approach is sometimes called divide and conquer.
Note that for a big problem like making a photomosaic, doing this once is probably not enough. The sub-problems are still too big to solve easily. So, we need to use divide-and-conquer again to break each sub-problem into several sub-sub-problems. We do this recursively, until we get to sub-sub-sub-...-sub problems that are small enough that we can solve them easily.
We can describe this process with pseudocode (that is, not necessarily real Python, but made to look like it):
def solve_big_problem(problem):
        if easy_to_solve(problem):                                      # if it's easy
                return solve(problem)                                   #  just solve it now!
        else:                                                           # otherwise
                sub_problems = divide_problem(problem)                  #  divide it into sub problems
                sub_solutions = map solve_big_problem sub_problems      #  solve each sub problem
                return combine_solutions(sub_solutions)                 #  and combine those partial solutions
Here, map is a function that applies another function to every
item in a list. The divide_problem(problem) evaluates to a
list of sub-problems. The value of map solve-big-problem
sub_problems is the result of applying
solve-big-problem to every sub-problem in that list.
Implementing solve, combine_solutions and divide_problem for a real problem is the difficult part. There is a real art to figuring out how to divide a big problem into a suitable set of smaller problems. Being able to do this well is the main thing that separates good problem solvers from mediocre ones.
Optional Reading: Chapters 1, 2 and 3 from the course book (free on-line).
Optional Reading: or start Unit 1 of Udacity Intro to Computer Science (free on-line).
Unless you have previous programming experience, I strongly recommend that you do at least one of the optional readings. If the material is difficult and you did not do any of the reading, then you should go and do the reading.
Python Expressions
Consider the following ten program fragments:-
150
-
70 + 80
-
+
-
100 + 100
-
150 > 100
-
if True: "always be careful" "to avoid mistakes" -
(3 > 2) and (4 > 5)
-
if (12 > 10): "good move" else: "try again" -
if (not "cookies"): "eat" else: "starve" -
(1 + 2 + 3)
-
if (10 > 5): "true"
- Explain why the fragment is not a valid Python expression; or,
- Predict what value the expression will evaluate to.
- One easy way to do this is to select the File menu in PyCharm, select Print, and then select the radio button for Print File Python Console.)
- If you're in a lab with no printer access, such as Olsson 001, just select the text from the Python Console, right click, choose Copy Selected Content, and then email it to yourself (e.g., via UVA Webmail). You can then print it later at your convenience.
If any expression evaluates to something different from what you expected in Question 1, figure out why. Don't change your answers to Question 1, but instead write down explanations of why you think Python produces the value it does instead of what you expected. (You don't lose any points on Question 1 or 2 if your answers are wrong, but you must fully attempt the questions.) You don't have to write anything down for the parts you predicted correctly.
Photomosaics
A (not too brilliant) kindergartner could follow these directions to make a photomosaic:
- Collect pictures to use as the tiles
- Ask your parents for some old magazines and scissors. (Note: it is important that you let your parents know you will cut up the magazines!)
- Repeat many times until you have enough pictures:
- Pick one of the magazines.
- Look through it until you find a good picture. A good picture is pretty small and colorful.
- Cut out the picture using the scissors.
- Break for milk and cookies.
- Find a really big picture you want to use as the master for the photomosaic.
- Put a thin piece of tracing paper on top of the master picture.
- Draw a grid on the tracing paper:
- Get a ruler and crayon.
- Repeat until the whole paper is covered with lines, starting at the
left edge:
- Line up the ruler parallel (Note: you might have to explain what this means to the kindergartener, but you can always give her a copy of Euclid's Elements) to the long edge of the paper.
- Draw a line using the ruler.
- Move the ruler a little bit to the right.
- Repeat until the whole paper is covered with lines, starting at the
top:
- Line up the ruler parallel to the top edge of the paper.
- Draw a line using the ruler.
- Move the ruler a little bit down the page.
- Naptime.
- Put on the tiles:
- For each rectangle on the grid that you drew on the tracing paper:
- Look through the tile pictures to find one that best matches the color on the master picture under that rectangle.
- Glue that tile picture onto the rectangle.
- For each rectangle on the grid that you drew on the tracing paper:
- Clean up the glue you spilled on the floor before adults get home.
We will create a photomosaic using Python in almost the same way — except the computer is much dumber than our kindergartener, so we need to break the steps into even smaller problems before it can perform them. (Our computer won't need to break for milk and cookies, but it will need to collect garbage.)
In step 7.a.i. the kindergartner has to look through the tile pictures to find one that best matches the color on the master picture under that rectangle. Your task for this problem set will be to define a function that does that.
First, we explain how the rest of the photomosaic program works. We show lots of code here, but don't worry if you don't understand all of it. You should attempt to understand how it works, but it is not necessary to completely understand all the code shown here to complete this assignment.
Creating a Photomosaic
We can divide the photomosaic problem into three big steps:
- Get images for the tiles and master.
- Select the tile images that best match the colors on the master.
- Display the tile images.
Color
All colors can be created by mixing different amounts of red, green and blue light — if you look closely at a television or computer monitor, you will see the whole image is made up of red, green and blue dots. We can represent a color using three numbers representing how much red, green and blue is in the pixel. For most computer images, there are a limited number of colors. In the images we will use, there are 256 different intensity values for each color. Hence, we can represent a color using three values between 0 and 255 to represent the amount of red, green, and blue in a pixel.
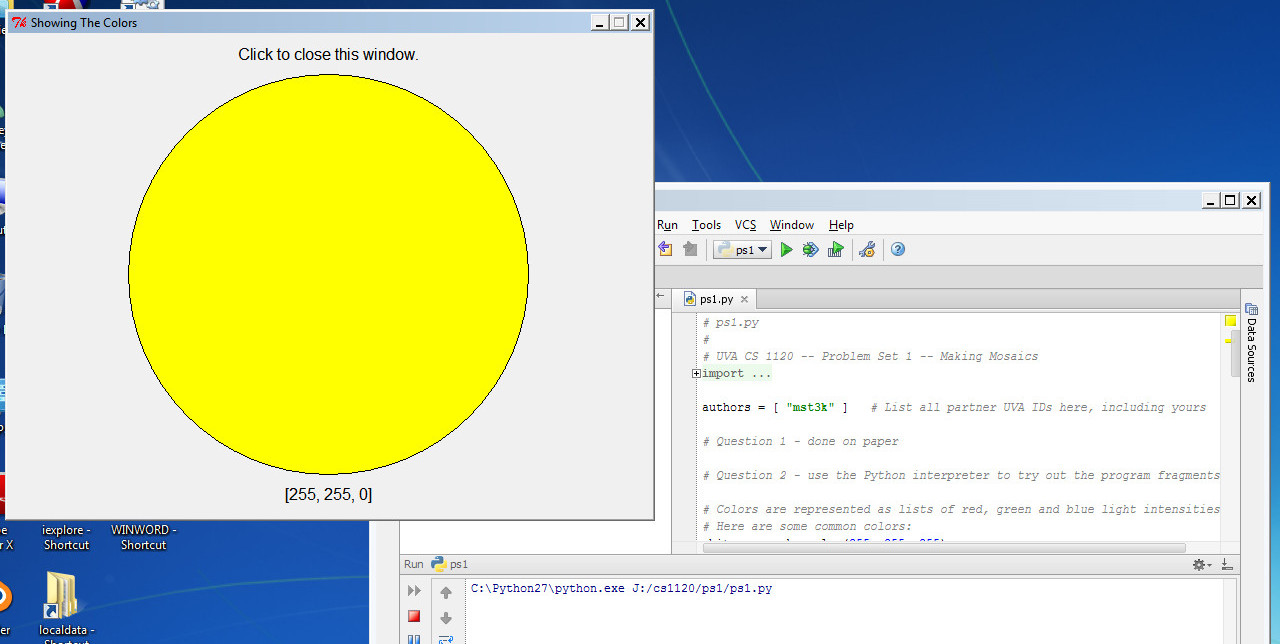
For example, [0, 0, 0] is black, [255, 255, 255] is white, [255, 0, 0] is red, [0, 0, 255] is blue, and [255, 255, 0] is yellow (mixing red and green light makes yellow).
The file mosaic.py (included in the ps1.zip file you downloaded) defines some procedures for manipulating colors:
- make-color(red,green,blue) — evaluates to a color with red, green and blue components given by the parameters. The color values are between 0 and 255. For example, make-color(255,0,0) is the color red.
- get-red(color) — evaluates to the red component of the color parameter. For example, get-red(make-color(255,0,0)) returns 255.
- get-green(color) — evaluates to the green component of the color parameter.
- get-blue(color) — evaluates to the blue component of the color parameter.
- show-color(color) — pops up a window that displays a circle of the color passed as its parameter.
# Colors are represented as lists of red, green and blue light intensities.
# Here are some common colors:
white   = make_color(255,255,255)
black   = make_color(0,0,0)
red     = make_color(255,0,0)
green   = make_color(0,255,0)
blue    = make_color(0,0,255)
yellow  = make_color(255,255,0)
Try evaluating show-color(yellow). You should see a small window appear containing a yellow circle:
If you see an error like
reference to undefined identifier:
yellow
it means you may not have loaded the correct
file. Be sure to open ps1.ss, following the directions in
the Lab Guide.
We can say color 1 is brighter than color 2 if the sum of the red, green and blue values of color 1 is greater than the sum of the red, green and blue values of color 2. This may not correspond exactly to our intuitive perception of colors, but it should be pretty close.
def brighter(color1, color2):
        # Fill in code here that determines if color1 is brighter than
        # color2. A good definition will need only a few lines of code.
        # Your procedure should always return either True or False.
Hint: you may want to use functions such as get_red.
Hint: don't forget to return the answer!
Test your procedure by evaluating it with several different parameters. For example, you should get these results:
>>> brighter(white, red)
True
>>> brighter(red, white)
False
>>> brighter(red, red)
False   # red is as bright as red, but NOT brighter
>>> brighter(red, blue)
False
>>> brighter(yellow, red)
True
Images
A computer represents an image by a bitmap. A bitmap is a two-dimensional array of picture elements (pixels). Each pixel is just one dot of color. A bitmap is actually a dot mosaic, where the tiles are individual colored dots.
Instead of storing images as bitmaps, we usually store them using a compressed format such as a GIF or a JPG. Compressed images take up less memory on the disk or to download, but are harder to manipulate. Fortunately, we provide functions for converting them to bitmaps so you don't need to worry about it. We can store our images in compressed formats and use these library functions to convert them into bitmaps when we use them in our photomosaic program.
The pixels in a bitmap are numbered on a grid. The top left corner is (0, 0). If the bitmap is w pixels wide and h pixels high, the bottom right corner is (w - 1, h - 1).
Selecting Tiles
To select tile images for our photomosaic we follow steps 5 through 7 from the kindergartener description. We don't need to worry about programming step 6 (naptime), but if you are working with a partner do keep remembering to switch places with your partner.
To find a tile image that matches a rectangle of the master image, we need to know the colors of both the tile images and rectangles in the master image.
Finding the Average Color of a Bitmap
To find a matching tile image, we need to know the "color" of each tile. One way would be to calculate the average color of each pixel in the tile image by adding the red, green and blue values for each pixel and dividing by the number of points. For example, if we wanted the average color of red (255 0 0) and blue (0 0 255) would sum the colors to get (255 0 255), and divide by two to get (127.5 0 127.5). This looks like purple, which is what you might expect:
| (255 0 0) | + | (0 0 255) | = | (255 0 255) | / 2 = | (127 0 127) |
def add_color(color1, color2):
        # Returns a new color that is equal to the sum of color1 and color2.
        return make_color(get_red(color1) + get_red(color2),
                get_green(color1) + get_green(color2),
                get_blue(color1) + get_blue(color2))
To average many colors, we need to add all the colors together and
then divide by the number of colors. One way to add a list of values
together is to divide it into two simpler problems: add the first
value to the sum of all the other values. That is,
SUM(a, b, c, d, e) = a + SUM(b, c, d, e)We can do the same thing for the remaining values:
SUM(b, c, d, e) = b + SUM(c, d, e)
   SUM(c, d, e) =     c + SUM(d, e)
      SUM(d, e) =         d + SUM(e)
         SUM(e) =             e + SUM()
          SUM() =                 0
The only tricky part is knowing what to do at the end when there are no
colors left. We define the SUM of no values to be 0.
Similarly, when there are no more colors left, we evaluate to the
0-color (black).
This is how we define sum-colors:
def sum_colors(color_list):
        # Sums all of the colors in a list of colors.
        if color_list is []:
                # If there are no colors to sum, return black.
                return make_color(0,0,0)
        else:
                # Otherwise, add the first color in the list to the
                # sum of the rest of the colors in the list.
                return add_color(color_list[0], sum_colors(color_list[1:]))
To calculate the average color of a bitmap, we just calculate the sum
of all the colors of the pixels in the bitmap, and divide by the
number of pixels.
Dividing the Master Image
We need to divide the master image into tile-sized regions and calculate the average color of each region. Our master image is a picture of the Rotunda.
We need to divide it up into tiles:

The number of tiles is going horizontally across the image is equal to the width of the master image divided by the width of each tile. The width of our original master Rotunda image is 1024 pixels, and the width of each tile is 28 pixels. We can just divide to get the number of tiles going horizontally:
>>> ow = 1024   # width of original master Rotunda tile image
>>> tw = 28     # width of each tile
>>> ow/tw       # divide to get the number of horizontal tiles
36
Python has a handy function called range that makes lists of numbers.
>>> range(3)
[0, 1, 2]               # first 3 natural numbers
>>> range(5)
[0, 1, 2, 3, 4]         # first 5 natural numbers
If we want to iterate over a list of possible horizontal tiles, we just combine range with our calculation from before:
>>> range(ow/tw)
[0, 1, 2, 3, 4, 5, 6, 7, 8, 9, 10, 11, 12, 13, 14, 15, 16, 17, 18, 19, 20, 21, 22, 23, 24, 25, 26, 27, 28, 29, 30, 31, 32, 33, 34, 35]
We then do the same thing vertically (based on the height of our original master image and the height of each tiles). You can find the actual code for this in mosaic.py, but you don't need to worry about it complete the assignment. If you're curious and would like to get an intuition for it, here's very similar similar code that makes a grid of nine tiles (like a Tic-Tac-Toe board):
for y in range(3):              # divide it up horizontally
        for x in range(3):      # and divide it up vertically
                print "(" + str(x) + "," + str(y) + ")    ",
        print ""                # start printing on the next line
(0,0)     (1,0)     (2,0)
(0,1)     (1,1)     (2,1)
(0,2)     (1,2)     (2,2)
The details of how for and str work are not important for this assignment.
Selecting the Tiles
We now know how to:
- Load the images
- Calculate the average color of each tile image — we use add_color
- Divide the master image into tile size regions
for sample_region in regions_of_original_master_image:
        sample_average_color = average_color_of(sample_region)
        best_tile = find_best_match(sample_average_color, all_tiles)
        paste_onto_photomosaic(best_tile)
The real heart of the action is find_best_match, which
will return the tile that best matches the color of a sample region of the
master image. Here's how it works:
- If there is only one tile available, it must be the best match (it's also the only match, but it's the best match).
- If there are exactly two tiles available, we pick whichever tile is a closer_color to the desired sample. We haven't written a closer_color procedure yet, but we'll promise to do so later.
- If there are three or more tiles available, we use divide and conquer. Suppose there are X tiles. We set aside one tile so that there are X-1 left. Then we call find_best_match on those X-1 tiles. So now we have our set-aside tile and the best match of the X-1. But that's just two tiles, so we pick whichever tile is a closer_color to the desired sample.
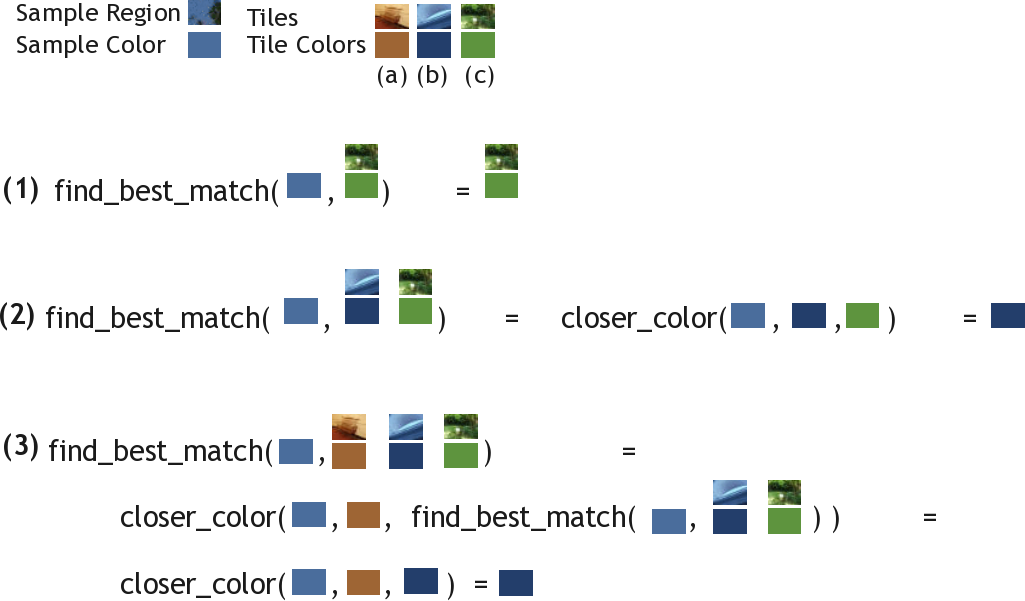
At the top we see our sample region (blue sky with part of a tree) and its average color (light blue). We also have three tiles in this example: tile (a) is brown, tile (b) is dark blue, and tile (c) is green.
- If we are asked to find the best match between the blue sample tile and only the green tile is available, then the green tile must be our answer.
- If we are asked to find the best match between the blue sample tile and two tiles, dark blue and green, are available, then we figure out that dark blue is a closer_color to light blue than is green, so we return the dark blue tile.
- If we are asked to find the best match between all three tiles, we first set the brown tile aside. Now we're left with just the dark blue and the green tiles, and we call find_best_match on them. But we already know what that answer is (it was in the previous paragraph): the best match there is the dark blue tile. So now we just have the brown tile and the dark blue tile. We again use closer_color and determine that dark blue is closer to light blue than is brown. So we finally return the dark blue tile.
def find_best_match(sample_color, tiles, tile_colors, closer_color):
        # Given a sample color, find the tile that is closest to
        # that sample color according to closer_color.
        if tiles is []:
                print "Error: you must give us at least one tile!"
                return None
        elif len(tiles) is 1:
                # There is only one tile, so it must be the best match.
                return [tiles[0], tile_colors[0]]
        else:
                # We'll "set aside" the first tile and call it "a".
                # We note that tile and its color:
                [a_tile, a_color] = [tiles[0], tile_colors[0]]
                # The tiles we didn't set aside are tiles[1:].
                # The tile_colors we didn't set aside are tile_colors[1:].

                # Now we call find_best_match recursively on all
                # of the tiles we didn't set aside. (Since we set
                # one aside, that's a smaller problem, and thus easier
                # to solve!)
                [b_tile, b_color] = find_best_match(sample_color, tiles[1:], tile_colors[1:], closer_color)

                # So now we have a_tile, the tile we set aside, and
                # b_tile, the best of all of the other tiles. We just
                # use closer_color to pick between them!
                if closer_color(sample_color, a_color, b_color):
                        return [a_tile, a_color]
                else:
                        return [b_tile, b_color]
If you look carefully, you can see that we've folded the "two tiles case" and the "three or more tiles case" into one giant "two or more tiles case". So now
Loading the Tiles and Master
We still need to figure out how to create the list of tiles. Suppose we start with a list of filenames of images and want to turn that into a list of bitmaps to use as the tiles. How can we break that into simpler problems?
If we have a function that can load one tile image, then all we need to do is apply that function to every filename in the list of image filenames.
We can do that with map or with list comprehensions. The function map applies a function (map's first parameter) to every element in a list (map's second parameter). A list comprehension is a way of defining one list in terms of the elements of another: for example, a list of loaded images is just like a list of image filenames if you load every element.
def load_many_images(image_filenames):
        return map(load_one_image, image_filenames)
or:
def load_many_images(image_filenames):
        return [ load_one_image(filename) for filename in image_filenames ]
Both of those code samples compute the same result!
Now, all we need are ways of getting a list of image filenames and for loading one image. We could just create the list of images by hand, but for a good photomosaic we need many images. So, we instead put all the tile images in a directory and use a function that gets a list of all files in a directory. Python provides glob (yes, the name is funny!) to do that. The actual code provided is a bit more complicated: we want the name of the directory of images to be a parameter, and we only want to load .GIF images (a particular image compression format).
Putting Everything Together
We need to combine all the steps now into one procedure that produces a photomosaic. Here is pseudocode that does so:
def make_photomosaic(original_filename, tile_directory, closer_color):

        # Load the original master image (e.g., the Rotunda)
        original = load_one_image(original_filename)

        # Find all of the names of all of the tile files
        tile_filenames = glob(tile_directory, ".GIF")

        # Load all of the tile images
        tile_images = load_many_images(tile_filenames)

        # For each tile image, find its average color.
        tile_colors = map(image_average_color, tile_images)

        # Consider a grid over the original master image
        for y in range(number_of_vertical_tiles):
                for x in range(number_of_horizontal_tiles):
                        # For each grid position (x,y) ...

                        # Look at just the sample in this grid position
                        sample_region = get_part_of_image(original, x, y)

                        # Compute its average color
                        sample_color = image_average_color(sample_region)

                        # Find the best match for this grid's color
                        # from among all the tiles we have!
                        best_tile = find_best_match(sample_color, tile_images, tile_colors, closer_color)

                        # Paste the best tile over this grid position.
                        draw(best_tile, x, y)
That's it! You can find the real code in mosaic.py — it
includes extra details, such as the grid size calculation, but you've
seen all of the key concepts.
Matching Colors
We're all done now, except for the procedure that determines which of two colors is a better match for another color. That is left for you to do.
Your function should look like
def closer_color(sample, color1, color2):
        # Fill in with code that returns True if sample is closer to color1
        # than it is to color2. Return False otherwise.
In addition to the standard arithmetic operators (+, *, -, /), comparison operators (<, >, =), provided procedures for manipulating colors (get_red, get_green and get_blue), some other procedures you may find useful include:
- abs(number) — evaluates to the absolute value of number parameter. For example, abs(-3) == 3.
- sqrt(number) — evaluates to an approximation of the square root of the number parameter. For example, sqrt(2) == 1.4142135623730951.
- pow(number,exponent) — raises the number to the given power. For example, pow(7,2) == 49 (i.e., 7 squared is 49).
>>> closer_color(white, white, black)
True    # white is closer to white than to black
>>> closer_color(white, black, white)
False   # white not not closer to black than to white
>>> closer_color(red, orange, blue)
True    # red is closer to orange than to blue
You may find that you are implementing a mathematical formula that has common subexpressions. For example, to compute (x - y) * (x - y) * (x - y), you might compute (and type out!) (x - y) three times. Here are two ways to avoid that sort of "duplicate work":
def cube_it(a):
        return (a * a * a)

def first_way(x,y):
        return cube_it(x - y)
In the first way, you use procedural abstraction. You just compute
(x - y) once, and then pass it in as the parameter to a procedure
like cube_it that you make up. I recommend this first approach.
Here's a second way:
def second_way(x,y):
        a = x - y               # declare temporary variable named a
        return (a * a * a)      # use temporary variable named a
Here we are introducing a local temporary
variable named a that holds the value (x - y).
Once your closer_color procedure works for the simple examples, you can try to create a photomosaic by uncommenting this line at the bottom of the provided ps1.py file:
make_photomosaic("rotunda.gif", "tiles/", closer_color)
You can also pass in another .gif image instead of
"rotunda.gif" if you have one.
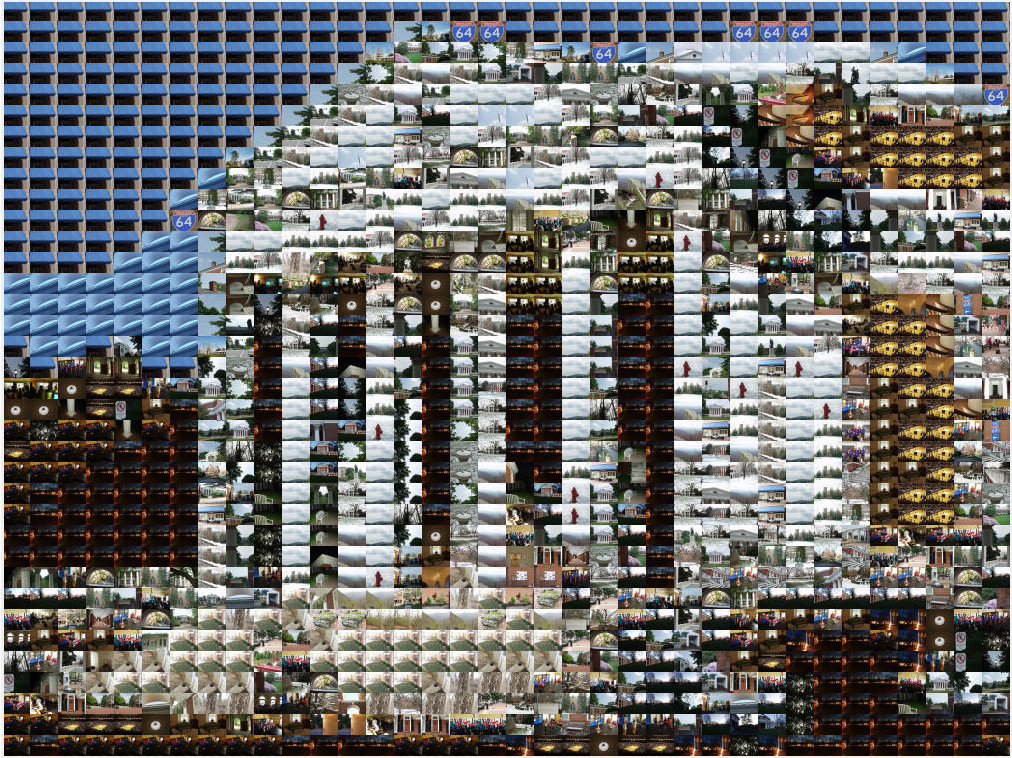
If your closer_color procedure is good, you should be able to recognize the rotunda when you see the photomosaic. Experiment with different ways of deciding which two colors are closest to improve your photomosaic, but try simple things first. A good closer_color procedure should produce a photomosaic similar to this one:
- print your assignment on the computer with your all-caps UVA ID
in at least a 24 point font
and/or
- write your assignment with your UVA ID at least one inch tall in block letters.
Typically it's easiest to just print out your assignment as normal and then add another huge UVA ID with a pen or pencil.
In addition, if your on-paper assignment involves multiple pages, you must securely staple them. Ad hoc taping jobs, paper clips, and loose pages all come apart when all of the assignments are put in a pile. You will lose the point for this question if your assignment is not properly secured.
Teasers
Mosaics touch on many computer science issues, some of which we will return to later in the course.Higher Order Functions. We used map to apply a function to every element of a list. map is an example of a higher order function — that means it is a function that takes other functions as parameters. Higher order functions can be very powerful. In Problem Set 2 (and throughout the course), we will explore higher order functions and recursion.
Lists. Many functions in this assignment operated on lists. In Problem Set 2, you will understand lists and implement functions that operate on lists (for example, you will be able to implement map).
Computational Complexity. Our program might use the same tile image over and over again. If there is a large section of the same color in our master image, the same tile image will be repeated for that whole section. This looks pretty bad. A real mosaic would never reuse the same tile. Producing a non-duplicating photomosaic is an extremely hard problem. In fact, it is such a hard problem that no one knows for sure whether or not there is a fast solution (we'll explain exactly what we mean by fast here later in the course) to finding the best photomosaic tiling. Computer scientists call this an NP-hard problem. If someone discovers a fast way to produce the best possible non-repeating photomosaic, then it means there are also fast solutions to many other seemingly unrelated and important problems (such as the "travelling salesperson problem" where the goal is to find the best route for a salesperson to visit a set of cities, and the "cure most deadly diseases problem" where the goal is to find a sequence of proteins that folds into a particular shape). We will explore this about halfway through the course.
Searching. Our program takes a long time to run for even small photomosaics. A really smart kindergartner wouldn't find a good match by looking through all the images scattered haphazardly on the floor; instead, she would sort the images into groups based on their color. Then she could easily see all the bluish images together, and pick the one that best matches a particular square. Our program has to consider every image for every rectangle. A better program would be able to quickly find the best image without having to consider every image every time. Computer scientists do a lot of work on finding better ways to search. Google's database has 8,168,684,336 web pages (as of 21 August 2005, they don't publicize their database size any more). If it searched them the same way we search for images and could consider 10000 pages per second, it would take over three days to get a response to your query. We will look at some better ways of searching in a few weeks.
Concurrency. One thing to note about our problem division solution, is that some of the steps can be done in different orders, but others can only be done after an earlier step is already complete. For example, we can do steps 3, 4 and 5 before step 1, but we cannot do step 7 before step 1. If we have a whole class of kindergartners to help make our photomosaic, we could give each of them a magazine and have them all collect tile pictures at the same time. One way to make computers solve a problem quicker is to divide the problem into pieces that can be done at the same time, and have different computers work on each piece at the same time.
Photomosaic-mosaics. A photomosaic is a mosaic made with photo tiles. We could also make a photomosaic-mosaic, a mosaic made with photomosaic tiles. Of course, why stop there? We could make a photomosaic-mosaic-mosaic, a mosaic where the tiles are photomosaic-mosaics. If we have a lot of computing power, we could make a photomosaic-movie, a movie where the frames are photomosaics, or a moviemosaic-photo, a still image where the tiles are movies instead of still images. The introduction to the 1998 World Cup features a moviemosaic-movie (or perhaps more accurately, moviemosaic-mosaic-mosaic-movie) that has been seen by several billion people!
Software Patents. Robert Silvers claims to have a patent (United States Patent 6,137,498: Digital composition of a mosaic image) on Photomosaics. We're not sure what the ancient Babylonians have to say about this, but software patents raise lots of complex legal issues. One would have to check with a lawyer to determine if you can redistribute your code from this problem set, but we encourage you to do so and would be happy to defend a test case against this patent.