Injecting and Testing Faults in ArduPilot
Manual Flight Mode Yaw Fault
Kevin Angstadt
angstadt@umich.edu
University of Michigan
Introduction
This tutorial provides step-by-step instructions for injecting a bug into the APM:Copter (ArduCopter) autopilot software stack, deploying the faulty software to a Pixhawk-based multicopter (the 3dr Iris+), and simulating the bug using Software in the Loop (SITL) simulation. In particular, the injected bug will result in the multicopter yawing (rotating) only in the clockwise direction under manual controller input.
A multicopter is not required to conduct the SITL simulation (only a joystick is required). Simply follow
the directions for acquiring dependencies, and skip ahead to injecting a bug. You do not need to issue any
make commands; these are handled by the shell script for SITL.
These instructions have been tested with Ubuntu 14.04 x64 using ArduCopter 3.3.
Acquire and Install ArduPilot and Dependencies
-
Install
git:sudo apt-get update
sudo apt-get install git -
Install dependencies for SITL:
sudo apt-get install gdebi python-matplotlib python-serial python-wxgtk2.8 python-lxml
sudo apt-get install python-scipy python-opencv ccache gawk python-pip python-pexpect
sudo pip install pymavlink MAVProxy -
Clone the ArduPilot source:
git clone https://github.com/diydrones/ardupilot.git
-
Run script to install prerequisites (including the cross-compiler) on Ubuntu:
ardupilot/Tools/scripts/install-prereqs-ubuntu.sh -y
If you receive an error about
grepnot being found, run this command a second time, and it should succeed. -
Add your user to the
dialoutgroup:sudo usermod -a -G dialout $USER
-
Download and install APM Planner 2:
wget -O apm_planner.deb http://ardupilot.com/wp-content/plugins/download-monitor/download.php?id=111
sudo gdebi apm_planner.deb -
Log out and log back in
Back Up 3dr Iris+ Parameters
To save yourself many headaches in the future, now is a great time to back up the parameters on your 3dr Iris+. We will also use this as an opportunity to update the parameters to support telemetry on the RC controller for AdruCopter >= 3.3.
-
Connect the Iris+ to computer via USB
-
Open APM Planner 2. Ensure File -> Advanced Mode is checked
-
Communication -> ttyS0 Settings
-
Update the connection settings as follows:
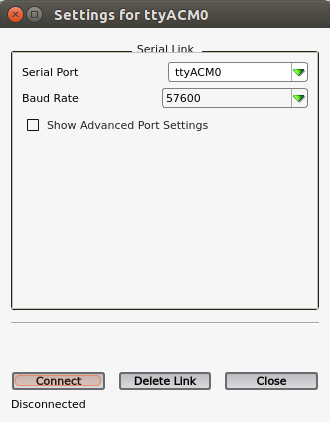
Once you perform this step, you will now have a ttyACM0 entry in the Communication menu rather than ttyS0. This port is used for communicating with the Iris+ via USB.
-
Click
connect. -
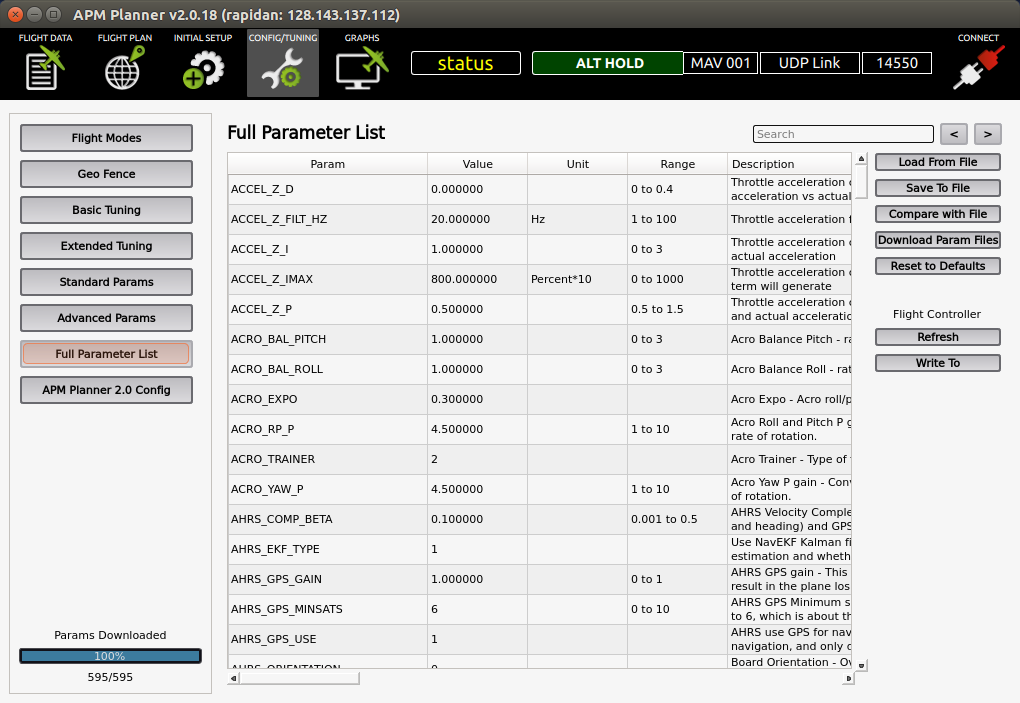
Choose the CONFIG/TUNING tab. Select Full Parameter List from the left side menu.
-
After ensuring that all parameters are downloaded (lower left of screen), choose
Save to Filebutton on right side of screen. -
Choose file location and name. Click
Save. You can now enter a comment to indicate what this file contains (for example "Iris+ Backup + Date"). ClickOK.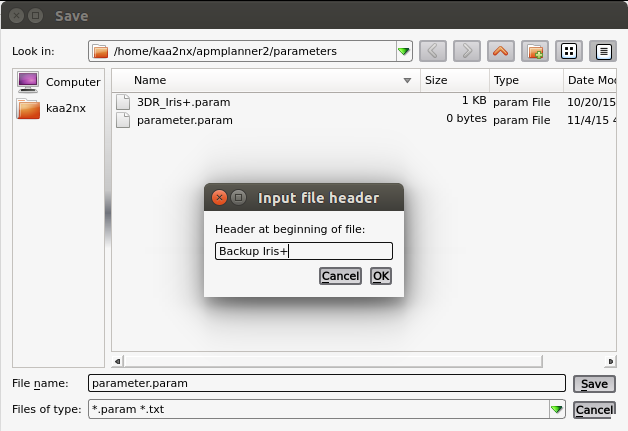
-
Now, we will ensure telemetry still functions with the newer firmware. Search for serial2. Ensure you have the following values for SERIAL2_BAUD and SERIAL2_PROTOCOL:
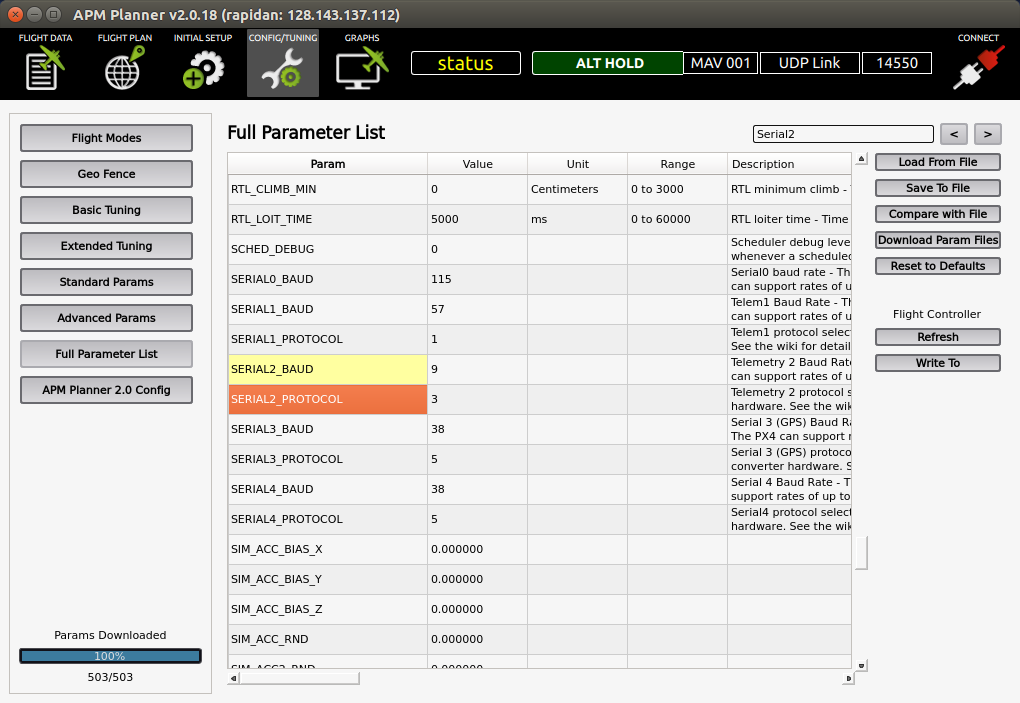
If the above values are different, change them, and save the parameters to file again, noting that these have an updated telemetry setting.
-
Click
Disconnectin the top right of APM Planner 2.
Build and Deploy Vanilla ArduCopter 3.3 for 3dr Iris+
-
Checkout Copter-3.3 branch:
cd ardupilot
git checkout Copter-3.3 -
Compile ArduCopter for the Iris+:
cd ArduCopter
make px4-v2-quad -
Copy the resulting binary somewhere easy to find:
cp ArduCopter-v2.px4 ~/
-
Flash the new firmware onto the Iris+:
-
Open APM Planner 2
-
Choose the INITIAL SETUP tab. Select Install Firmware.
-
Choose ttyACM0 for the Firmware upload port. Click
Custom -
Choose the ArduCopter-v2.px4 file that you just compiled. It will be in your home directory if you followed the steps above.
-
Follow the prompts (e.g. unplug and replug the USB cable).
-
-
Deploy the parameters backup:
-
Connect to the Iris+ (i.e. Communication -> ttyACM0; connect)
-
Choose the CONFIG/TUNING tab. Wait for parameters to download.
-
Click
Load From Filebutton. Locate the parameter backup with the telemetry fix. -
You should now see green entries in the parameters list. Click
Write To.
-
-
Recalibrate sensors as necessary (not explained here, but see here for instructions). Typically, only the accelerometer requires recalibration.
- Close out of APM Planner 2
Inject Bug into Attitude Control
-
Change into the
ArduCopterdirectory:cd ardupilot/ArduCopter
-
Modify the return value of the following function in
Attitude.cpp(line 45):// get_pilot_desired_heading - transform pilot's yaw input into a
// desired yaw rate
// returns desired yaw rate in centi-degrees per second
float Copter::get_pilot_desired_yaw_rate(int16_t stick_angle)
{
// convert pilot input to the desired yaw rate
return abs(stick_angle * g.acro_yaw_p);
}A negative
stick_anglerepresents yawing to the left (rotating counter-clockwise). By returning the absolute value, we force the yaw rate to be always positive and therefore clockwise. -
Compile new version of ArduCopter:
make px4-v2-quad
The resulting binary may now be flashed to the Iris+. See previous section, steps 4, 5, 6, and 7 for directions.
Observing Fault Using Software in the Loop (SITL) Simulation
To observe a fault in manual flight modes using the software simulators, you will need a USB joystick. This tutorial uses the Logitech Extreme 3D Pro Joystick.
n.b. This simulation requires a fair bit of screen real estate; be prepared to work with four windows at once. Dual monitors are not required, but definitely helpful.
-
Connect the joystick via USB
-
Change into the
ArduCopterdirectory:cd ardupilot/ArduCopter
-
The first time you run SITL, wipe the virtual EEPROM:
sim_vehicle.sh -w
-
This will print out several log messages. Once you see the following, quit the simulation with
^c:STABILIZE> APM: APM:Copter V3.3.1 (792e989c)
APM: Frame: QUAD
Received 528 parameters
Saved 528 parameters to mav.parm
fence breach
GPS lock at 0 meters -
Launch the simulation:
sim_vehicle.sh --console --map --quad
-
Launch APM Planner 2. The software should automatically connect to the simulator (You should see non-zero values in the info pane). If not:
-
Ensure File -> Advanced Mode is checked
-
Communication -> UDP Link (port:14550) Settings
-
Click Connect
-
If you do not see non-zero values now, restart APM Planner 2
-
-
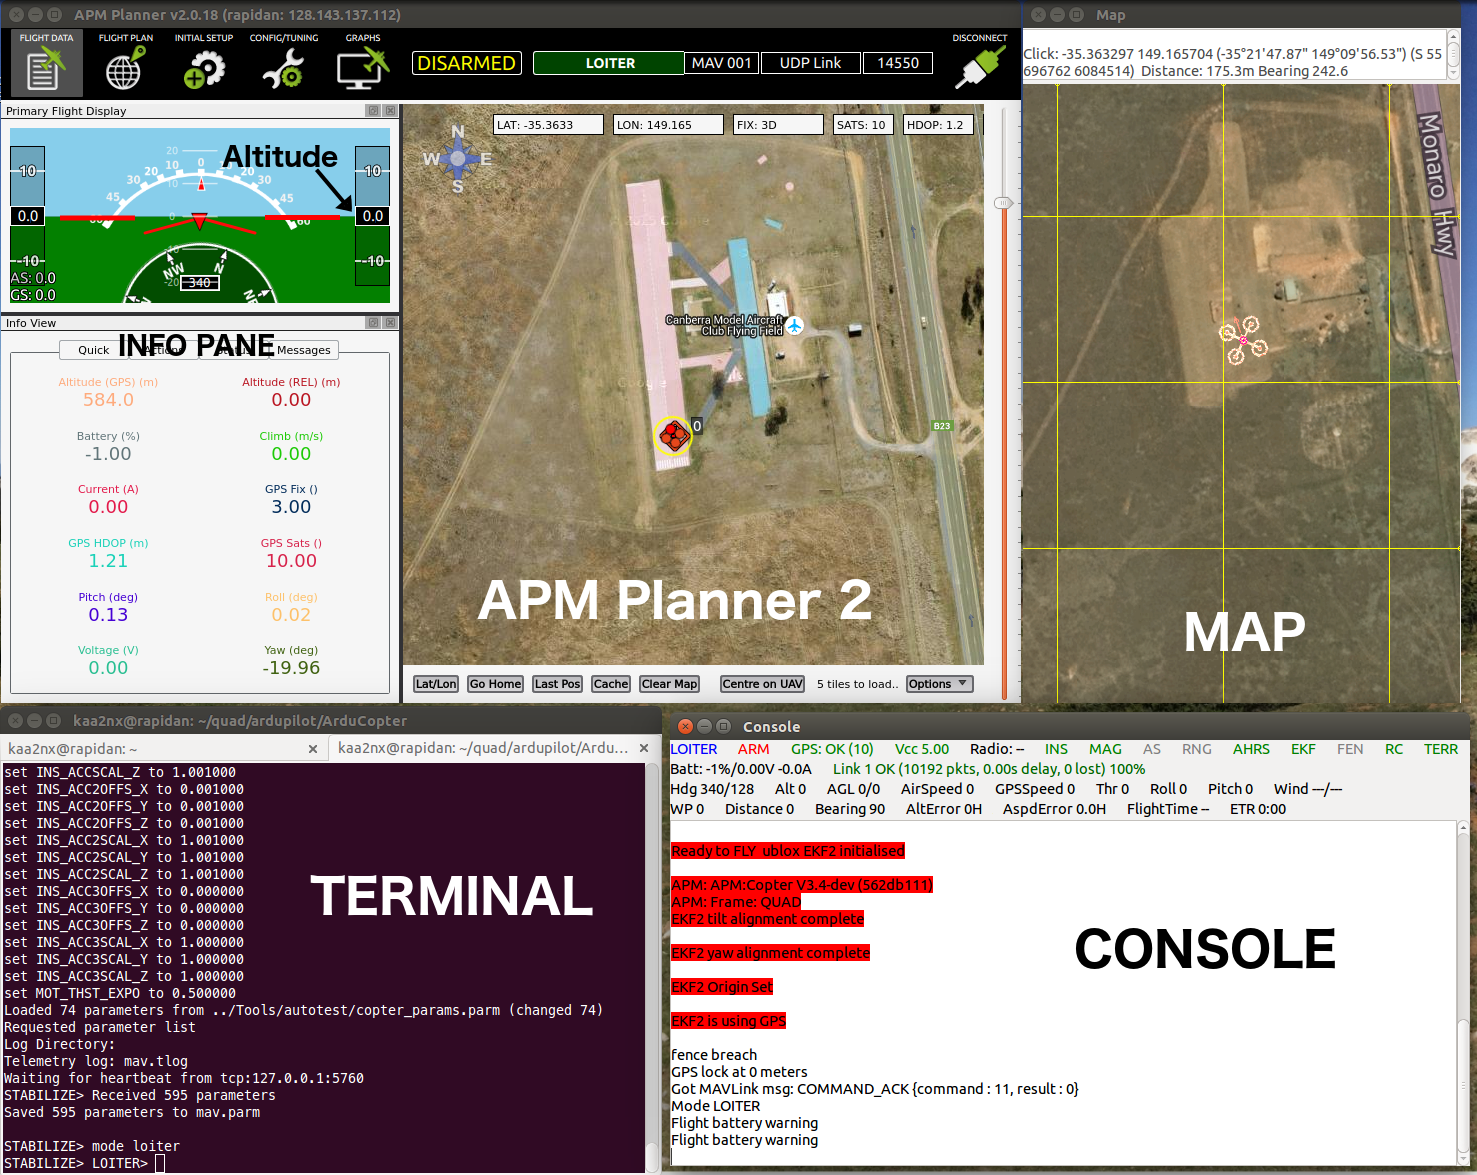
You now have four windows open and be located at the Canberra Model Aircraft Club Flying Field. Windows are labelled below to unify terminology:
-
Configure APM Planner 2 to use the Joystick:
-
File -> Joystick
-
If you are using the Logitech joystick, set the axes as follows:
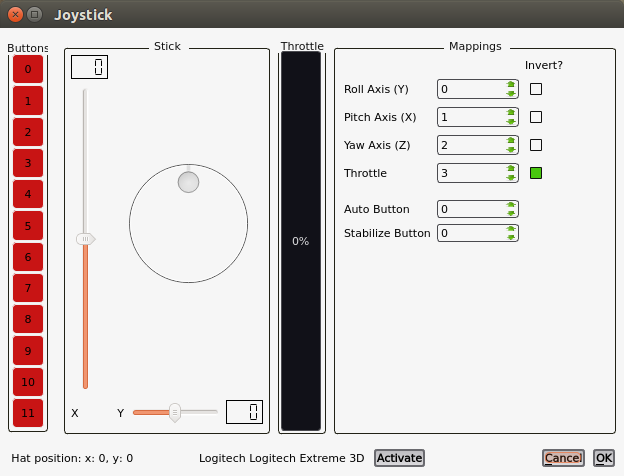
Other joysticks may have different channels/reversal mappings for desired functionality.
-
Click
Activateand thenOK.
-
-
Initiate flight using the terminal:
mode loiter
arm throttle -
Increase throttle on joystick to just above half-way point. You should see the quadcopter take off and the altitude increase in the Info pane of APM Planner 2. Move the throttle to the half-way point to maintain altitude.
Note: If you do not perform this step quickly after arming the motors (
arm throttle), the motors will disarm. You can see the status at the top of APM Planner 2. If the motors disarm, simply repeat the command to arm in the terminal. -
Twist the joystick to the right. You should see the quadcopter turn clockwise on the map.
-
To observe the bug, twist the joystick to the left. You should still see the quadcopter turn clockwise on the map. (We would expect the quadcopter to rotate counter-clockwise without the bug.)
-
To land, type the following into the terminal:
mode land
-
Close out of APM Planner 2 and terminate the simulation by pressing
^cin the terminal.
References
Building ArduPilot for Pixhawk/PX4 on Linux with Make. Accessed 2015-11-04. http://dev.ardupilot.com/wiki/building-px4-for-linux-with-make
FrSky Telemetry. Accessed 2015-11-04. http://copter.ardupilot.com/wiki/common-frsky-telemetry
Setting up SITL on Linux. Accessed 2015-11-04. http://dev.ardupilot.com/wiki/setting-up-sitl-on-linux
Last modified: 2015-11-09